How to Lace Military Boots
Few things derail a mission faster than ill-fitting boots that cause blisters or ankle rolls. Even the best tactical footwear fails if you do not know how to lace military boots correctly for your specific needs.
This guide details proven methods to lock your foot securely and distribute pressure evenly. You will learn step-by-step techniques to prevent slippage and ensure operational readiness.
Criss-Cross Lacing: The Standard Tactical Setup
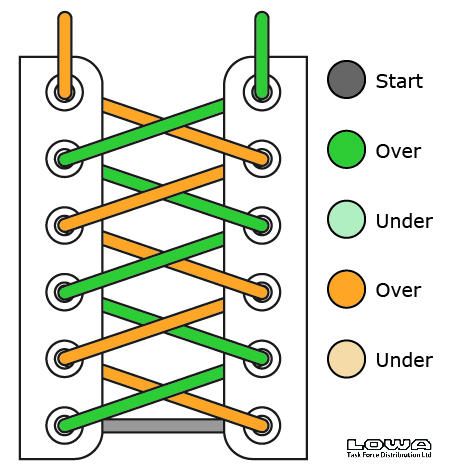
This method serves as the default for most boots and acts as the foundation for advanced techniques. Proper execution ensures even tension and allows for quick adjustments in the field.
Execute the Over-Under Method Correctly
Start by threading the lace through the bottom eyelets from the inside out. This keeps the lace flat against your foot and reduces snag hazards on gear or vegetation.
Cross the ends diagonally upward and feed each through the next eyelet on the opposite side. Repeat this inside-to-outside pattern until you reach the top eyelets.
Use the tactical over-under variation by passing the lace under the side of the eyelet instead of over it. This reduces friction and makes tightening upper sections easier without loosening lower ones.
Common mistake: Pulling the top too tight while the middle loosens. Tighten in stages by securing the lower third first, then the middle, and finally the top.
Straight-Bar Lacing: Pressure Relief & Dress Uniform Standard
Ideal for high arches or dress inspections, this method eliminates pressure across the bridge of your foot. It also allows medics to cut through all laces with a single slice during emergencies.
When to Use This Method
Choose Straight-Bar lacing if you experience numbness or pain on the top of your foot. Many units require this style for formal wear due to its clean, horizontal appearance.
Your boot must have an even number of eyelet pairs to execute this method correctly. Odd numbers will disrupt the symmetrical pattern required for proper function.
Step-by-Step Execution
- Thread the lace through the bottom eyelets from outside in.
- Run the left lace straight up the inside to the next eyelet and feed it out.
- Cross it horizontally to the right side and feed it outside in.
- Skip the second eyelet on the right side since it is already occupied.
- Feed the lace up through the third eyelet and continue alternating vertical and horizontal runs.
Pro Tip: In medical emergencies, a single vertical cut through all horizontal bars removes the boot instantly. This speed is why medics favor this pattern for combat medevac protocols.
Ladder Lacing: Maximum Stability for Paratroopers
Used by airborne units and ceremonial guards, this method locks every eyelet to prevent loosening. It provides unmatched rigidity for jumps, marches, or prolonged wear under heavy loads.
Why It Is Built for High-Stress Use
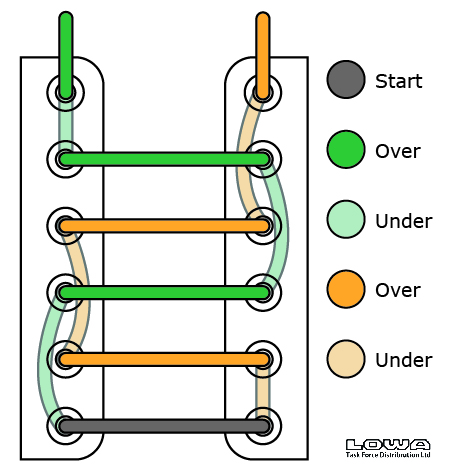
Ladder lacing creates a self-contained tension system where each horizontal bar locks under the vertical segment from the previous row. Once tied, it stays tight even under heavy rucks or rapid movement.
The trade-off is that it takes longer to tighten and loosen than other methods. Reserve this technique for missions where boot security is non-negotiable.
How to Lock Each Rung
- Start with a straight bar across the bottom eyelets from inside to outside.
- Run both ends straight up to the eyelets directly above and feed them outside in.
- Cross the laces horizontally but pass each end under the vertical lace segment from the previous row.
- Pull tight to lock the bar in place before repeating the process.
- Continue the up, through, and under-pass sequence until you reach the top.
Visual cue: If done correctly, the laces form a continuous ladder with no gaps or slack between the rungs.
Army Lacing: Break In Stiff Boots Faster

Designed for thick leather combat boots, this method reduces side tension and allows the upper to flex. It is critical during the break-in period for new gear.
How It Enhances Flexibility
Army lacing routes diagonal crosses inside the boot while leaving vertical runs on the outside. This lets the sides of stiff leather boots move more freely and reduces pressure points.
This technique is best for new boots, cold weather gear, or any time lateral foot movement feels restricted. It improves comfort significantly over long wears.
Inside-Out Execution Steps
- Start with a straight bar across the bottom eyelets from inside to outside.
- Run each lace straight up the outside to the next eyelet and feed it outside in.
- Cross diagonally inside the boot to the opposite eyelet above.
- Feed through, run up the outside again, and repeat the pattern.
All horizontal and diagonal crossovers happen inside the boot. Only vertical runs appear on the outside for a neat, professional look.
CAF Combat Lacing: The Canadian Forces Standard
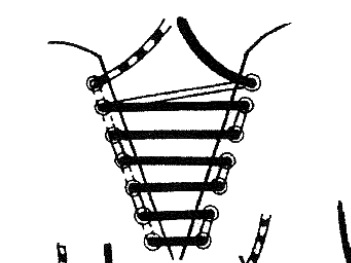
Mandated by the Canadian Armed Forces, this high-efficiency method maintains tension from bottom to top. It prevents the loosening that often occurs as you climb the eyelets.
Official Protocol Details
Known as the “Herring Bone” method, this technique uses alternating crossovers with a strict big-toe-end-on-top rule. On the right boot, the big-toe lace always crosses over the little-toe lace at every intersection.
Mirror this pattern on the left boot for symmetry. Every time a lace passes through an eyelet, the aglet must dive down into the hole rather than emerging from underneath.
Why It Outperforms Criss-Cross
The CAF method allows for two-handed tensioning where you pull inner and outer pairs simultaneously. This transfers tension smoothly without the slippage common in standard criss-cross patterns.
Once tightened, the friction between the tongue and sides locks the fit in place. This stability is why Canadian ice hockey players also adopt this method for tighter skate fits.
Four-Point Lock Lacing: Stop Heel Slippage

This finishing technique prevents blisters and secures narrow heels during rucking or mountain operations. Use it with Criss-Cross, Army, or Straight-Bar as a base layer.
Apply the Heel Lock Finish
- Lace normally to the second-to-top eyelet on both sides.
- Feed each end straight up into the top eyelet on the same side to create a vertical loop.
- Cross the laces and thread each through the opposite loop you just created.
- Pull tight to cinch the collar snugly around your ankle.
This action locks the heel in place and eliminates bounce. It is essential for soldiers with narrow heels or those operating in wet conditions where boots might swell.
Speed & Quick Lacing: Rapid Deployment Tactics
When seconds count, these methods get you mission-ready fast without sacrificing security. They are ideal for sudden call-outs or changing boots mid-mission.
Speed Lacing for Field Ops
Thread bottom eyelets and pull tight before tucking both ends under the first eyelet. Wrap laces around your fingers, pull taut, cross, and thread through the next pair repeatedly.
This results in even tension with no need to tie until the very top. It is significantly faster than standard lacing while maintaining a secure fit.
Quick Standard: The Double-Knot Base
Tie a double knot at the base of the laces after threading the bottom eyelets. Lace normally to the top and finish with a standard knot.
The bottom double knot acts as a tension anchor so lacing will not unravel from the bottom up. This is perfect for patrol boots and training exercises.
Double Knot Lacing: Maximum Security
For running, climbing, or combat drills, a single knot is not enough. A double knot prevents accidental untying under stress and keeps your gear secure.
How to Tie It Right
- Lace using your preferred method such as Army or Criss-Cross.
- Tie the standard bow but make two loops before pulling tight.
- Ensure the second loop is snug against the first for maximum hold.
- Tuck excess lace to the side according to your unit rules.
Warning: Never leave loose ends dangling as they create snag hazards in vehicles or gear. Use paracord for stronger, rot-resistant performance in wet conditions.
Shoelace Length & Material Guide
Using the wrong lace length or material compromises performance and safety. Follow established standards to ensure your laces function correctly in the field.
Choose the Right Length
| Eyelet Pairs | Length (inches) | Length (cm) |
|---|---|---|
| 5 | 40 | 102 |
| 6 | 44 | 112 |
| 7 | 48 | 123 |
| 8 | 53 | 133 |
Add 9 inches per extra pair beyond five eyelets. Note that Ladder lacing requires longer laces than standard methods due to the increased material usage.
Best Materials for Tactical Use
- Standard Issue: 1/4 inch flat or round cotton and poly blend.
- Upgrade to Paracord: 550 lb test strength that is water-resistant and durable.
- Avoid Cotton: It absorbs moisture, weakens over time, and stretches when wet.
Clean laces after every use and store them dry. UV exposure and moisture degrade fibers quickly if left unchecked.
Proper Lacing Posture: Avoid Shin Splints
Even the best technique fails if you lace while standing. Follow safety protocols to ensure proper foot placement and prevent injury.
Kneel to Lace Correctly
Kneel down with your shin pressed forward in the boot before starting. Ensure your foot is fully seated with the heel back and arch supported.
Lace from bottom to top while checking tension at each stage. Lacing while standing shifts the foot backward and increases the risk of shin splints and stress fractures.
Match Lacing to Mission Needs
Choose your method based on your specific environment, duration, and physical demand. Different scenarios require different approaches for optimal performance.
Wet or Muddy Conditions
- Use paracord laces for durability.
- Apply a double knot to prevent slipping.
- Avoid cotton laces that swell and weaken when wet.
Long Rucks or Marches
- Base your pattern on Criss-Cross or Army Lacing.
- Finish with a Four-Point Lock to prevent heel slippage.
- Wear wool or synthetic socks and never cotton.
Medical Readiness
- Use Straight-Bar or CAF Combat lacing for easy access.
- These patterns allow for single-cut boot removal in emergencies.
Dress Uniform Inspections
- Select Straight-Bar lacing for a neat appearance.
- Ensure laces are tucked neatly to the outside or inside per unit rules.
Frequently Asked Questions About How to Lace Military Boots
Which lacing method is best for high arches?
Straight-Bar lacing is superior for high arches because it eliminates diagonal pressure across the top of the foot. This prevents numbness and pain on the bridge of the foot during long wears.
How do I stop my heels from slipping in military boots?
Apply the Four-Point Lock finish to your current lacing pattern. This creates a vertical loop that cinches the collar around your ankle to lock the heel in place.
What type of shoelaces should I use for tactical boots?
Use 550 paracord or military-grade synthetic laces. These materials resist rot, repel water, and maintain strength in mud and abrasive conditions better than cotton.
Why do Canadian soldiers use a specific lacing method?
The CAF Combat method maintains tension from bottom to top without loosening. Its unique crossover pattern allows for efficient two-handed tightening that stays secure during activity.
Can I use ladder lacing for everyday wear?
You can, but it is difficult to tighten and loosen quickly. It is best reserved for high-stress activities like parachuting or marching where maximum stability is required.
How long should my military boot laces be?
For 6 pairs of eyelets, use 44-inch laces. Add approximately 9 inches for every additional pair of eyelets to ensure you have enough length for tying secure knots.
Key Takeaways for Learning How to Lace Military Boots
Mastering these techniques optimizes your safety and endurance in the field. Always choose a method that matches your mission needs, such as Straight-Bar for pressure relief or Ladder lacing for maximum stability.
Remember to lace while kneeling to ensure proper foot placement and prevent injury. Start with the Criss-Cross method for basics, then advance to specialized patterns like CAF Combat or Heel Lock as your operational requirements demand.