How to Lace Long Shoelaces
Long shoelaces drag on the ground and trip you up with every single step you take. You do not need to cut them or suffer through constant annoyance when better solutions exist.
This guide reveals exactly how to lace long shoelaces using hidden knots and clever patterns. You will learn to hide excess length securely while keeping your shoes looking sharp and professional.
Hide Excess Length With Hidden Knots
These techniques pull loose lace ends inside the knot structure itself. This method eliminates dangling tails completely for a clean look.
Use the Hidden Knot for a No-Show Finish
This approach is the gold standard for formal wear or anyone who hates loose flapping laces. It pulls all extra material into the base knot so nothing hangs down.
- Lace your shoes using your preferred pattern.
- Tie a standard starting knot by crossing one lace over the other.
- Thread both loose ends directly through the loop of the base knot.
- Pull firmly to draw the ends deep inside the knot structure.
- Tuck any tiny remaining bits under the shoe tongue.
Pro Tip: This works best with flat laces. Waxed laces often resist tucking smoothly.
Try the Bunny Ears Tuck Trick
Keep the familiar bow shape but remove the floppy ends that hit your ankles. This variation addresses long ears and tails simultaneously.
- Form the initial base knot on your shoe.
- Create two standard loops known as bunny ears.
- Tuck the free lace ends under the bow base before tightening.
- Pull the loops tight to force excess length beneath the knot.
The tucked ends act as anchors that prevent slippage while reducing overall bow size.
Master the Ian Knot Double Wrap
Ian Fieggen developed this method to tie the fastest and tightest knot possible. It naturally shortens lace ends through its unique wrapping mechanism.
- Cross your laces and make a simple loop with one end.
- Wrap the opposing lace twice around the first loop.
- Pull the second lace through the new loop you created.
- Tighten both ends to secure the compact structure.
This creates a snug knot with minimal tail exposure perfect for sports.
Reinforce Hold With the Surgeon’s Knot
Use this variation when you need maximum tightness and resistance to loosening. It is especially useful for slippery or waxed laces.
- Cross the laces and make a double pass through the first knot.
- Wrap the laces twice before pulling them tight.
- Complete the bow as you normally would.
The extra friction locks the base securely and reduces slack during movement.
Add a Loop Twist for Extra Security
This stylish twist eats up length while resisting accidental untying. It adds a unique visual element to your footwear.
- Tie a standard base knot to start.
- Form a small loop at the end of each lace segment.
- Twist these two loops together once firmly.
- Tie the final securing knot through the twisted loops.
The twisted base resembles a figure eight and adds flair while securing tails.
Lacing Patterns That Consume Length

Changing how you thread laces uses up extra material before you even tie them. These proactive patterns solve length issues at the source.
Criss-Cross Lacing With a Twist
Modify standard criss-cross lacing to add length consumption at every eyelet pair. This increases friction and visual interest simultaneously.
- Start at the bottom and lace straight across the first set.
- Twist the laces to form an X before threading through the next eyelet.
- Repeat this twisting motion all the way up the shoe.
Each twist consumes one to two extra inches of lace material effectively.
Apply Ladder Lacing Technique
This pattern creates vertical rungs that use more lace than diagonal paths. It distributes pressure evenly across your foot.
- Lace straight across the bottom row of eyelets.
- Run each lace vertically up the same side of the shoe.
- Cross and lace straight across the next row of eyelets.
- Repeat this process to form a ladder shape.
Wide shoes or high-top sneakers benefit most from this even pressure distribution.
Switch to Straight Bar Lacing
Achieve a sleek minimalist look that changes lace path efficiency. This method offers consistent tension throughout the shoe.
- Feed one end straight across the bottom row.
- Run each lace straight up its own side without crossing.
- Lace horizontally at each level up the shoe.
Note that this uses slightly less lace than criss-cross so pair it with a hidden knot.
Try Fan Lacing for Style
Turn long laces into a fashion statement with this bold pattern. It spreads laces outward from a central point effectively.
- Start lacing from the center bottom eyelet.
- Spread laces outward in a V-shape crossing at wider intervals.
- Continue upward while forming a distinct fan pattern.
This works great for boots with eight or more eyelets and can consume six to ten extra inches.
Lock Heels With Runners Loop
Secure your heel while using excess lace in the locking mechanism. This performance favorite prevents slippage during activity.
- Lace normally up to the second to last eyelet.
- Loop each lace back through its own top eyelet to form a small loop.
- Cross the laces and thread them down through these loops.
- Pull tight to lock the heel and secure the extra length.
This bonus step uses three to five inches of extra lace in the lock.
Conceal Loose Ends After Tying
Post-tie strategies keep remaining tails out of sight when knotting alone is not enough. These methods manage what is left over.
Tuck Into the Tongue or Lining
This is the fastest fix for any shoe type or style. It requires no special knotting skills whatsoever.
- Push lace ends inside the shoe under the tongue after tying.
- Tuck behind the ankle padding for high-top shoes.
- Ensure you do not overstuff to avoid pressure points.
Warning: Overstuffing can cause discomfort or create painful pressure points on your foot.
Use the Hidden Loop for Active Wear
Prevent untying during runs or workouts with this specific configuration. It secures the tail effectively.
- Make a small loop near the base before the final bow.
- Thread the lace end through this loop carefully.
- Tighten the knot to anchor the tail securely.
The tail becomes anchored which reduces movement and prevents loosening.
Apply the Locking Loop Method
Reinforce any existing bow to keep it stable. This forces the knot to stay tighter during wear.
- Tie your regular bow as you normally do.
- Pass the loose ends through the bottom of the knot loop.
- Pull to lock the ends in place firmly.
The ends emerge from the side of the bow rather than the top for stability.
Try the Loop and Tuck Quick Release
Balance security with easy removal using this simple technique. It allows for quick undoing when needed.
- Form a small loop at the very end of each lace.
- Tuck the tail back into its own loop securely.
- Tie the bow as usual to finish the process.
Pull the tail to release instantly which is great for parents or kids.
Create a Dual Bow Design
Double the bows to double the length used in your lacing. This adds decorative flair while providing extra security.
- Tie a small bow near the midfoot area first.
- Continue lacing up and tie a second bow at the top.
- Adjust tension between both bows for comfort.
This popular style in skate culture turns excess into a design feature.
Fashion the Bow Tie Lace Look
Layer your bows for visual interest and length management. This stylistic choice manages length creatively.
- Tie a standard bow at the top of the laces.
- Thread the remaining ends through the top eyelets again.
- Tie a second smaller bow on top of the first one.
This works best for boots where laces extend well above the ankle.
Permanent Fixes and Tools for Long Laces
Consider these lasting solutions when temporary tricks are not enough for your needs. They offer long-term relief.
Use Shoelace Keepers or Clips
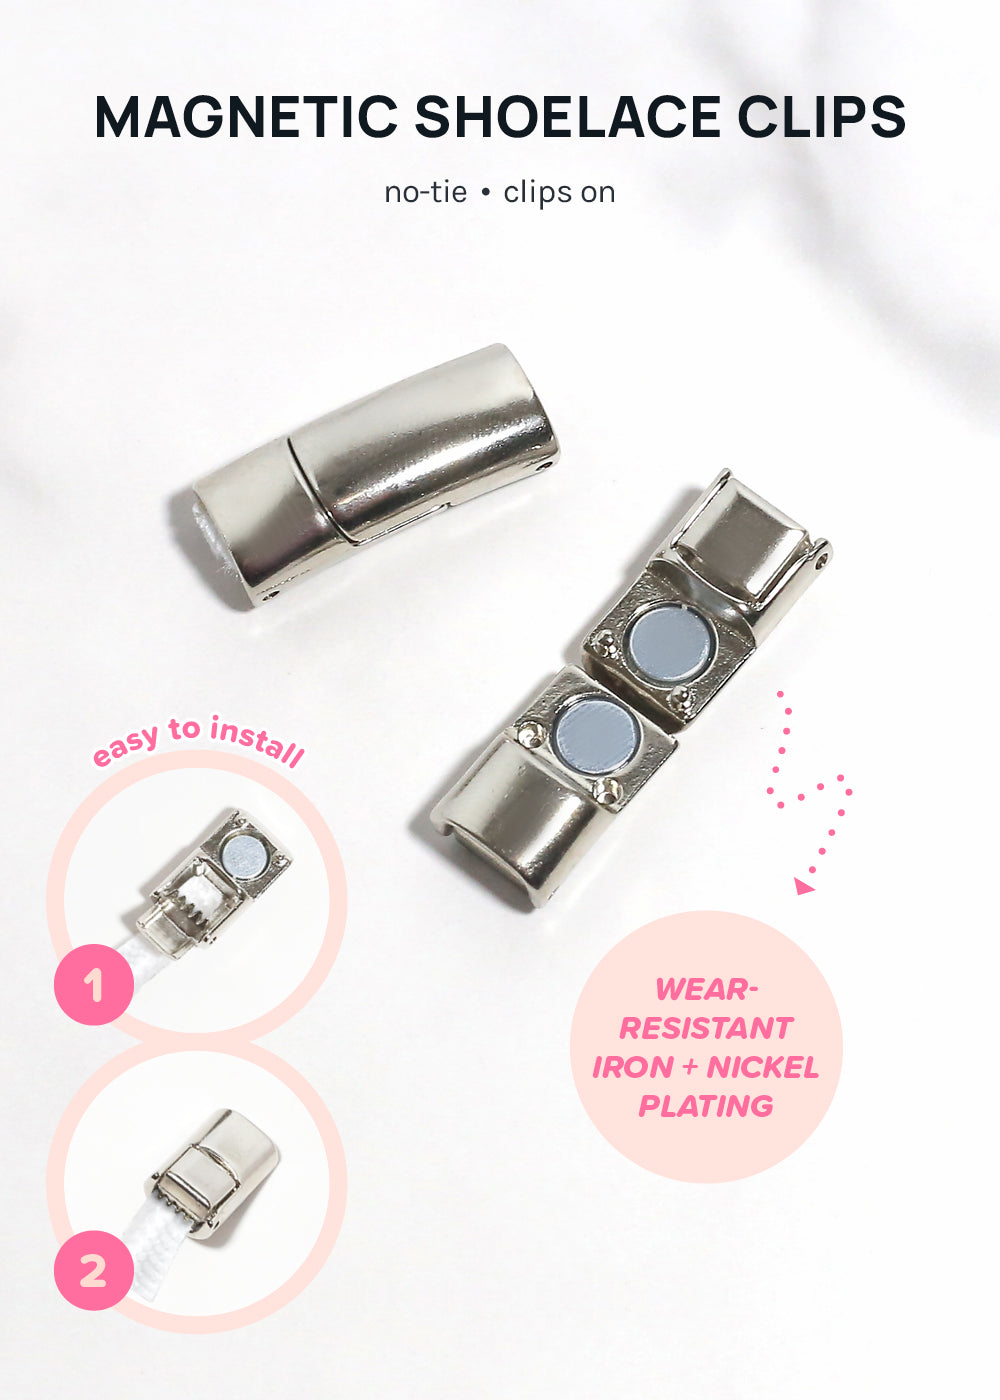
Simple reusable tools bundle excess lace neatly against your shoe. They require no cutting or permanent changes.
- Clips: Slide onto tails after tying to hold them together.
- Loops: Attach to the shoe back to loop laces through.
- Magnetic keepers: Snap tails neatly against the shoe side.
Choose low-profile keepers for dress shoes and rubberized ones for sports.
Trim the Laces Carefully
A one-time fix works well if done with precise measurements. You must verify length before cutting.
- Tie your shoes with your usual knot style.
- Mark where ends extend beyond the knot aiming for six to eight inches.
- Remove laces and cut at your marked line carefully.
- Seal ends with glue or heat to prevent fraying.
Critical Rule: Never cut shorter than six inches total as knots need length to stay secure.
Stitch for Permanent Hold
Secure lace ends directly into the shoe for a custom solution. This is ideal for high-end footwear.
- Thread lace ends into the shoe inner lining.
- Sew them in place with strong thread or a leather patch.
- Trim excess and seal the area neatly.
Only do this if you are certain about lace length since it is irreversible.
Choose the Right Method for Your Needs

Match your method to your lifestyle and shoe type for best results. Different situations require different approaches.
For Runners and Athletes
- Best combo: Heel Lock plus Ian’s Double Knot.
- Why: Prevents slippage and resists untying efficiently.
- Bonus: Add a locking loop for extra trail security.
For Fashion and Style
- Top picks: Fan Lacing and Bow Tie Lace.
- Why: Turns long laces into a statement piece.
- Pair with: Contrasting lace colors to highlight patterns.
For Work and Formal Wear
- Go-to: Hidden Knot or Invisible Tuck.
- Why: Clean professional look with no loose ends.
- Avoid: Bulky knots or visible clips in professional settings.
For Permanent Solutions
- Trim if: Laces are removable and consistently too long.
- Stitch if: You want a custom no-maintenance fix.
- Test first: Try tucking or knotting for a week before cutting.
Frequently Asked Questions About Long Shoelaces
How much lace should I leave when trimming?
You should leave six to eight inches total per lace to ensure functionality. Cutting shorter than six inches may prevent you from tying a secure knot.
Which knot is best for running with long laces?
The Heel Lock combined with the Surgeon’s Knot offers the best security for runners. This combination prevents slippage and keeps laces tight during high-impact activity.
Can I fix long laces without cutting them?
Yes you can use hidden knots or tucking methods to manage length without cutting. Techniques like the Hidden Knot or Loop Twist consume excess material effectively.
What is the fastest way to hide long lace ends?
Tucking the ends under the shoe tongue is the fastest method available. It requires no special knotting skills and takes only seconds to complete.
Do shoelace clips damage the laces?
No most clips and keepers are designed to hold laces without causing damage. They simply bundle excess material neatly against the shoe or ankle.
Which lacing pattern uses the most lace length?
Fan Lacing and Ladder Lacing typically consume the most lace length. These patterns create wide spans or vertical rungs that use up extra material quickly.
Key Takeaways for Fixing Long Shoelaces
Managing long laces is about control rather than limitation. You can hide excess length with hidden knots or consume it through smart lacing patterns.
Start with non-permanent methods like the Hidden Knot or Heel Lock before trying permanent fixes. Test these techniques to find the perfect balance of style and function for your shoes.