How to Lace Shoes Straight Across: Quick Steps
If your current lacing method causes instep pain or looks messy, learning how to lace shoes straight across offers an immediate solution. This technique replaces diagonal crosses with horizontal bars that reduce pressure on high arches while creating a sharp, professional appearance.
This guide teaches you the standard alternating method and a faster single-end version for beginners. You will also discover specific tricks for handling odd numbers of eyelets and tips to prevent common twisting errors.
Why Straight Bar Lacing Reduces Foot Pressure
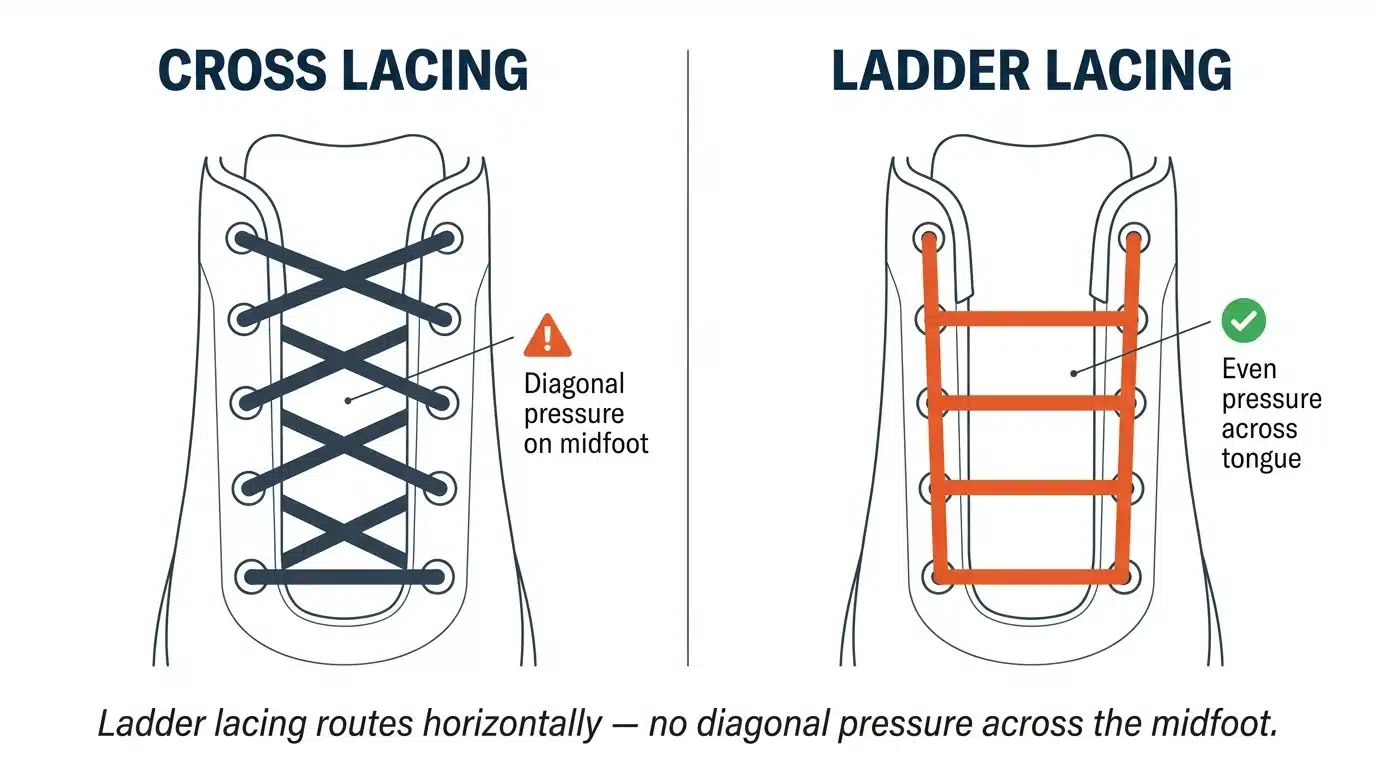
Traditional crisscross lacing creates focal points where diagonals intersect the top of your foot. These intersections often pinch the instep, leading to discomfort during long periods of wear or athletic activity.
Straight bar lacing eliminates these diagonal tension points entirely. The laces run horizontally across the exterior, distributing pressure evenly over a wider surface area. This design is particularly beneficial for individuals with high arches, bunions, or sensitive feet who experience “lace bite.”
What Makes This Method Different
The defining feature is the path the lace takes inside the shoe. Instead of zigzagging underneath the tongue, the lace travels vertically up one side before crossing to the other. This creates a series of parallel bars on the outside while keeping the interior free of交叉 friction.
Who Benefits Most from This Style
Runners and hikers often use this method to prevent hot spots on the dorsum of the foot. It is also a favorite for formal wear, as the clean lines complement dress shoes like Oxfords and Derbies better than chaotic crisscross patterns.
Step-by-Step Standard Alternating Method
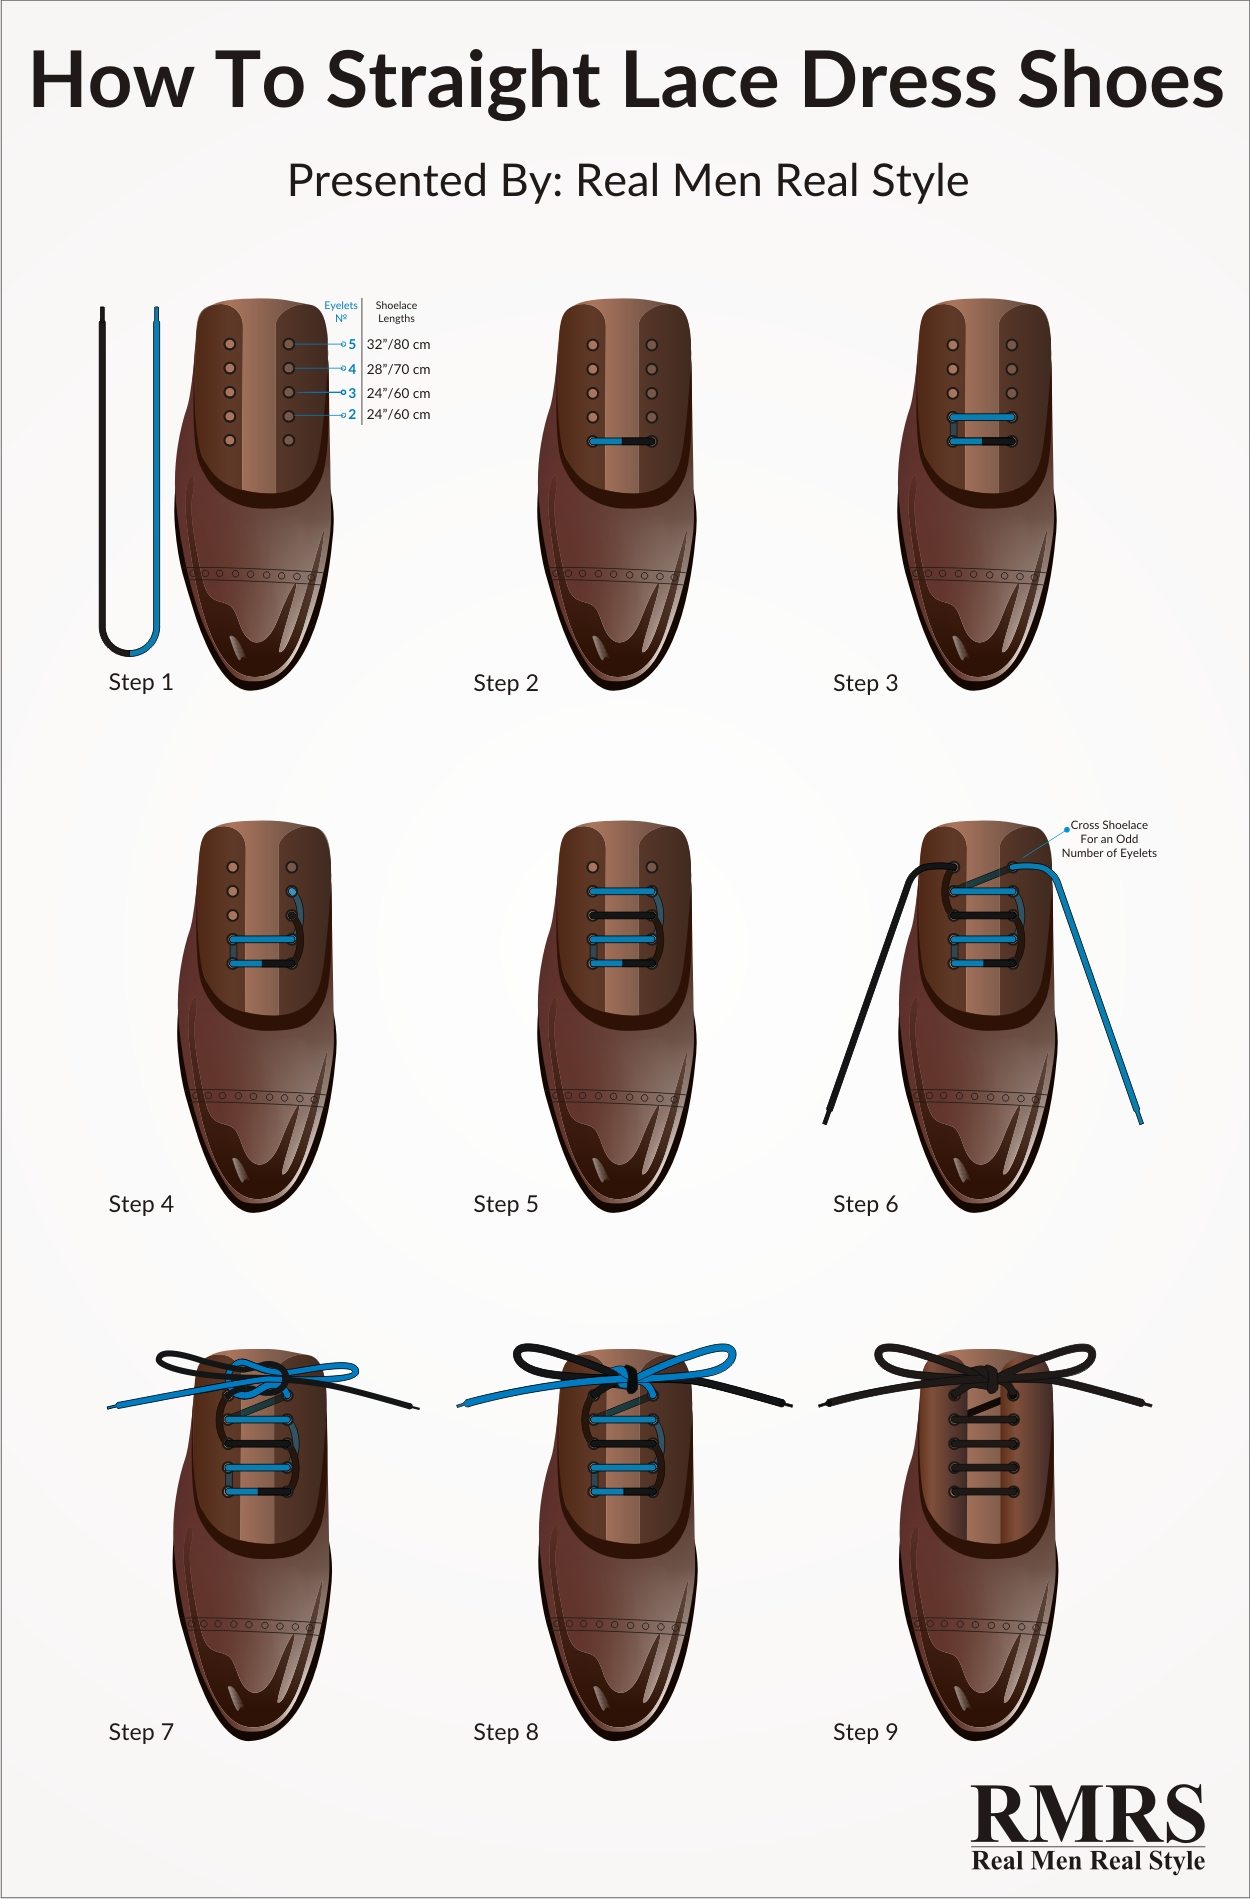
This technique uses both ends of the shoelace actively to create the bars. It offers the most control over tension but requires attention to detail to maintain symmetry.
Start with the Bottom Bar
Thread both ends of your shoelace through the bottom-most eyelets from the inside out. Ensure the lace lies flat and both ends are equal in length. This forms your first horizontal bar across the toe box.
Pull gently to remove slack without distorting the shape of the shoe opening. The lace should sit flush against the tongue with no twists.
Alternate Sides Moving Upward
Take the left lace end and run it vertically up the inside of the shoe. Skip the second eyelet and emerge through the third eyelet from the bottom. Pull it straight across the exterior to the right side and thread it down into the matching third eyelet.
Next, take the right lace end. Run it vertically up the inside, skipping the now-occupied third eyelet, and emerge through the fourth eyelet. Pull it straight across to the left side and thread it down.
Repeat Until Reaching the Top
Continue this alternating pattern until you reach the top eyelets. Each lace end stays on its respective side while traveling up the interior, only crossing the shoe on the exterior to form a bar.
- Left end goes up inside, skips one, crosses outside, goes down.
- Right end goes up inside, skips one, crosses outside, goes down.
Ensure you pull each bar tight and horizontal before starting the next ascent. This maintains even tension throughout the lacing field.
Secure the Final Knot
Once both ends emerge from the top eyelets, adjust the overall tension by pulling both ends simultaneously. Tie a secure bow or an Ian Knot to prevent loosening during wear.
For a hidden finish, thread the ends back down through the top eyelets and tuck them under the tongue. This leaves only the clean bars visible.
Easy Single-End Method for Beginners
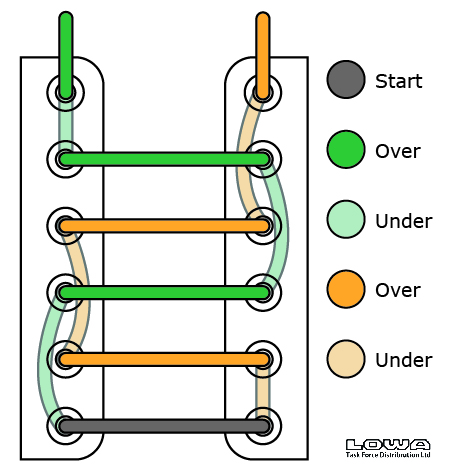
If the alternating method feels confusing, the single-end technique simplifies the process by using only one working end to create all the bars.
Set One End as Static
Thread the right end through the bottom-right eyelet from the inside out. Leave this end very short, just long enough to tie a knot later. Thread the left end through the bottom-left eyelet, leaving it long as your working end.
This setup creates the first bar. The short right end will remain passive until you reach the top of the shoe.
Loop One Lace Up and Across
Take the long left end and run it up the inside of the left side to the next available empty eyelet. Bring it straight across the exterior to the right side and thread it down.
From the inside, run the lace vertically up to the next higher eyelet on the right side. Cross it back to the left and thread it down. Repeat this cycle of up, across, down, and up until you reach the top.
Adjust Tension and Tie
When the working end reaches the top, both lace ends should be emerging from the top eyelets on opposite sides. Pull the short static end and the long working end together to even out the tension across all bars.
Tie your knot securely. This method reduces the chance of misalignment since you are only managing one active strand at a time.
Fixing Odd Numbers of Eyelets

Straight bar lacing works perfectly on shoes with an even number of eyelet pairs. However, shoes with 5, 7, or 9 pairs present a challenge because both lace ends end up on the same side at the top.
Use the Across and Back Trick
Lace normally until one end reaches the second-to-top eyelet. Instead of crossing to the opposite side, run the lace straight across the exterior to the other side. Immediately loop it back through the same eyelet from the outside in.
This maneuver brings both ends to the top eyelets on opposite sides, allowing you to tie a standard knot. The double pass is usually hidden by the knot itself.
Add a Single Diagonal Segment
Introduce one diagonal cross to shift the lace ends to opposite sides. You can place this diagonal at the very top, where the bow will cover it, or at the very bottom where it is less noticeable.
This compromise allows you to use the straight bar pattern for most of the shoe while ensuring the laces meet correctly for tying.
Skip an Eyelet Pair
Simply leave the top pair or bottom pair of eyelets unused. This converts a shoe with 7 pairs into a lacing field of 6 pairs.
While this reduces the total height of the laced area slightly, it preserves the pure straight bar aesthetic without needing complex workarounds. This is ideal for casual sneakers but may reduce ankle support in boots.
Pro Tips for Perfect Straight Bars
Achieving a flawless look requires attention to lace type and tension management. Small adjustments make a significant difference in the final result.
Choose Flat Laces for Best Results
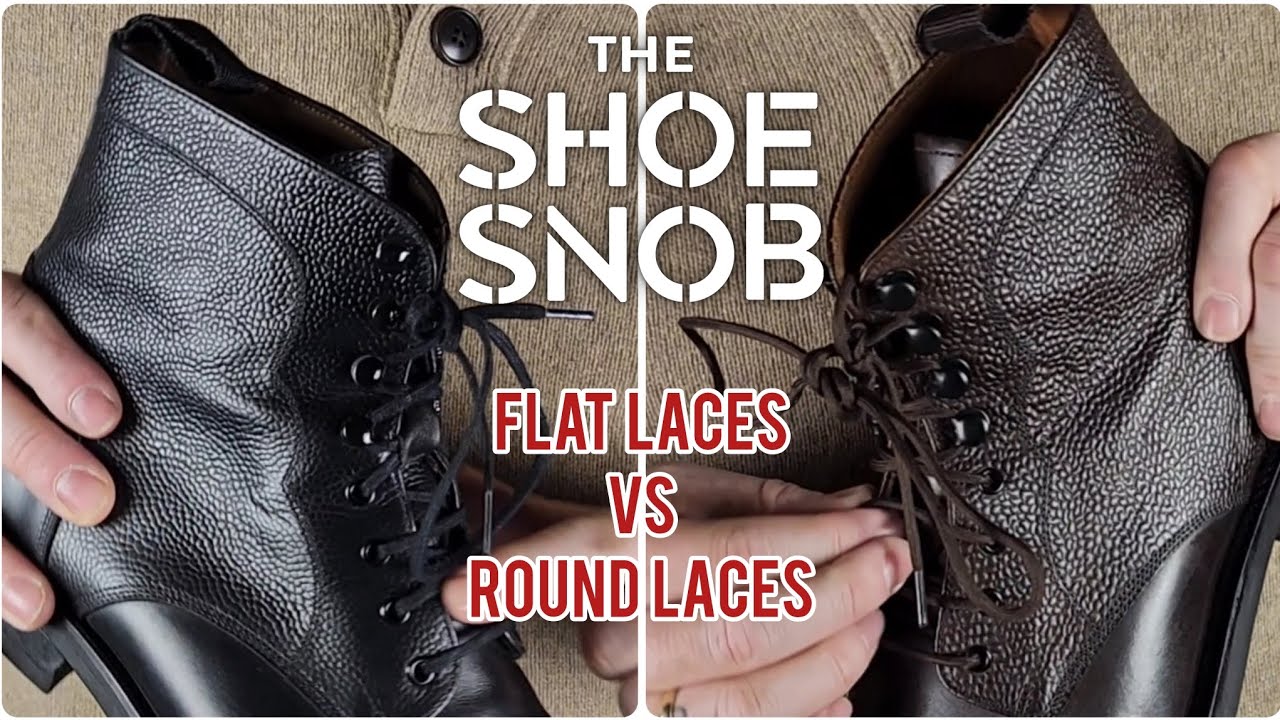
Flat laces lie flush against the shoe, enhancing the geometric bar effect. Round or oval laces tend to twist and roll, which disrupts the clean horizontal lines.
High-contrast colors like white laces on black shoes highlight the pattern but also reveal imperfections. If using contrasting colors, be extra meticulous with alignment.
Prevent Twisting and Slanting
Twisted laces are the enemy of this style. After every time you cross the lace to the other side, stop and flatten it with your fingers.
Ensure you pull each bar horizontally with consistent force. Uneven tension causes the bars to slant diagonally, ruining the parallel effect. Check your work frequently as you move up the shoe.
Mirror Your Left and Right Shoes
For balanced comfort, lace your left and right shoes as mirror images. If the vertical run is on the inside of the left foot, ensure the opposite configuration on the right foot if possible, though standard symmetry is usually sufficient for most wearers.
This ensures that internal vertical tension is distributed equally, preventing one shoe from feeling tighter than the other.
When to Use Hybrid Lacing Methods
You do not have to use straight bar lacing for the entire shoe. Combining it with other techniques can offer specific functional benefits.
Combine with Lock Lacing for Sports
Use straight bars for the lower eyelets to relieve instep pressure, then switch to lock lacing at the top two pairs. This creates a secure heel lock that prevents slipping during running or hiking.
To do this, lace straight bars up to the second-to-last pair. Cross the laces normally to the last eyelet, then loop each end back through the previous eyelet before tying.
Skip Eyelets for Pain Relief
If you have a specific sore spot on your foot, skip the eyelets directly above that area. Straight bar lacing accommodates this well because skipping an eyelet does not break the visual pattern as noticeably as it does in crisscross lacing.
This customization makes the method excellent for medical recovery or conditions like gout where specific pressure points must be avoided.
Common Mistakes and How to Fix Them
Even experienced lacers make errors when switching to this style. Identifying these issues early saves time and frustration.
Laces Keep Loosening
Cause: The lack of diagonal friction means the laces do not self-tighten as much as crisscross patterns.
Fix: Use a secure knot like the Ian Knot or a double knot. Ensure you pull the vertical segments tight before tying the final bow.
Bars Appear Crooked
Cause: Inconsistent pulling tension or failing to flatten the lace.
Fix: Pull every cross strictly horizontal. Manually adjust each bar with your fingers to ensure they are parallel to the ground.
Ends Do Not Meet on Odd-Eyed Shoes
Cause: Attempting the standard alternating method on a shoe with an odd number of eyelet pairs.
Fix: Recognize the odd count early and switch to the “Across and Back” trick or add a diagonal segment.
Frequently Asked Questions About Straight Bar Lacing
Does straight bar lacing work on all types of shoes?
This method works best on shoes with an even number of eyelet pairs, such as many dress shoes and sneakers. Shoes with odd numbers require a workaround, and boots requiring high ankle lockdown may need a hybrid top section.
Why do my laces feel looser with this method?
The sensation of looseness occurs because pressure is distributed evenly rather than focused on diagonal points. Your foot is secure, but the lack of pinching creates a “glove-like” feel that differs from traditional tight lacing.
How much lace length does this method save?
Straight bar lacing typically uses 15 to 20 percent less lace than crisscross lacing. This efficiency provides longer ends for tying knots or allows you to use shorter laces for a cleaner look.
Can I use this lacing style for running?
Yes, many runners use this style to reduce instep pain. However, adding a lock lace at the top is recommended to ensure the heel remains secure during high-impact activities.
What type of shoelaces look best with this pattern?
Flat laces are highly recommended as they lie flat and create distinct bars. Round laces often twist and obscure the clean geometric lines that define this style.
Key Takeaways for Lacing Shoes Straight Across
Mastering how to lace shoes straight across transforms both the comfort and appearance of your footwear. You eliminate painful pressure points on your instep while achieving a sleek, professional look that stands out from standard crisscross patterns.
Remember that flat laces yield the best visual results and that odd-numbered eyelets require simple tricks like the “Across and Back” method to function correctly. Whether you choose the standard alternating technique or the easier single-end version, the result is a customized fit that protects your feet.
Try this method on your next pair of sneakers or dress shoes to experience the difference. Once you feel the even pressure distribution, you may never want to return to traditional lacing.