How to Lace Roller Skates
You strap on your roller skates only to feel your heels slip or your instep ache minutes into your session. This discomfort often stems from poor lacing rather than ill-fitting boots or weak ankles.
Learning how to lace roller skates correctly transforms your stability and prevents painful blisters during every glide. This guide details five proven methods to lock your foot in place and relieve pressure points for a smoother ride.
Essential Preparation Steps for Proper Lacing
A secure fit begins before you tie the first knot. Skipping foundational steps leads to twisted laces and uneven pressure that ruins your skating experience.
Bottom-Up Lacing Protocol
Always start at the lowest eyelets to build even tension from heel to ankle. This approach ensures your foot sits correctly within the boot before you tighten the upper sections.
- Thread one lace end through the bottom eyelet from the inside out.
- Repeat this process on the opposite side with the other lace end.
- Pull both ends until they are perfectly even in length.
- Snug the laces gently without crushing your foot yet.
This foundation keeps the tongue centered and prevents the laces from twisting as you move upward.
Maintain Straight and Flat Laces
Crooked laces create painful pressure points on the top of your foot. Ensure each segment lies flat against the tongue as you work your way up the eyelets.
If you notice bunching or twisting, undo the last step and rethread the lace immediately. The Over-Under method described later helps keep laces flat and prevents them from shifting during movement.
Adjust for Short Lace Lengths
Do not skip eyelets randomly if your laces feel too short to reach the top. Instead, use the second-to-top eyelet to tie your knot while maintaining necessary ankle support.
- This technique often provides enough length for a secure tie.
- Consider buying longer laces if this happens frequently.
- Standard skate laces typically range from 72 to 96 inches depending on height.
Standard Criss-Cross Lacing Method
This classic technique remains the go-to choice for most recreational skaters due to its simplicity and effectiveness. It distributes pressure evenly across the entire foot for a balanced feel.
Why Choose Criss-Cross Lacing
- Provides uniform pressure distribution
- Easy to learn and quick to execute
- Works well for both quad and inline skates
This pattern is ideal if you are a beginner or simply skating for fun around the neighborhood.
Step-by-Step Criss-Cross Instructions
- Begin with laces threaded through the bottom eyelets from inside out.
- Cross the left lace over to the right side and feed it into the next eyelet from outside in.
- Repeat with the right lace crossing to the left side.
- Continue alternating sides until you reach the top eyelets.
- Tie a secure double knot to finish.
Pro Tip: Pull each cross evenly to avoid one side feeling tighter than the other.
Heel-Lock Lacing to Prevent Slippage
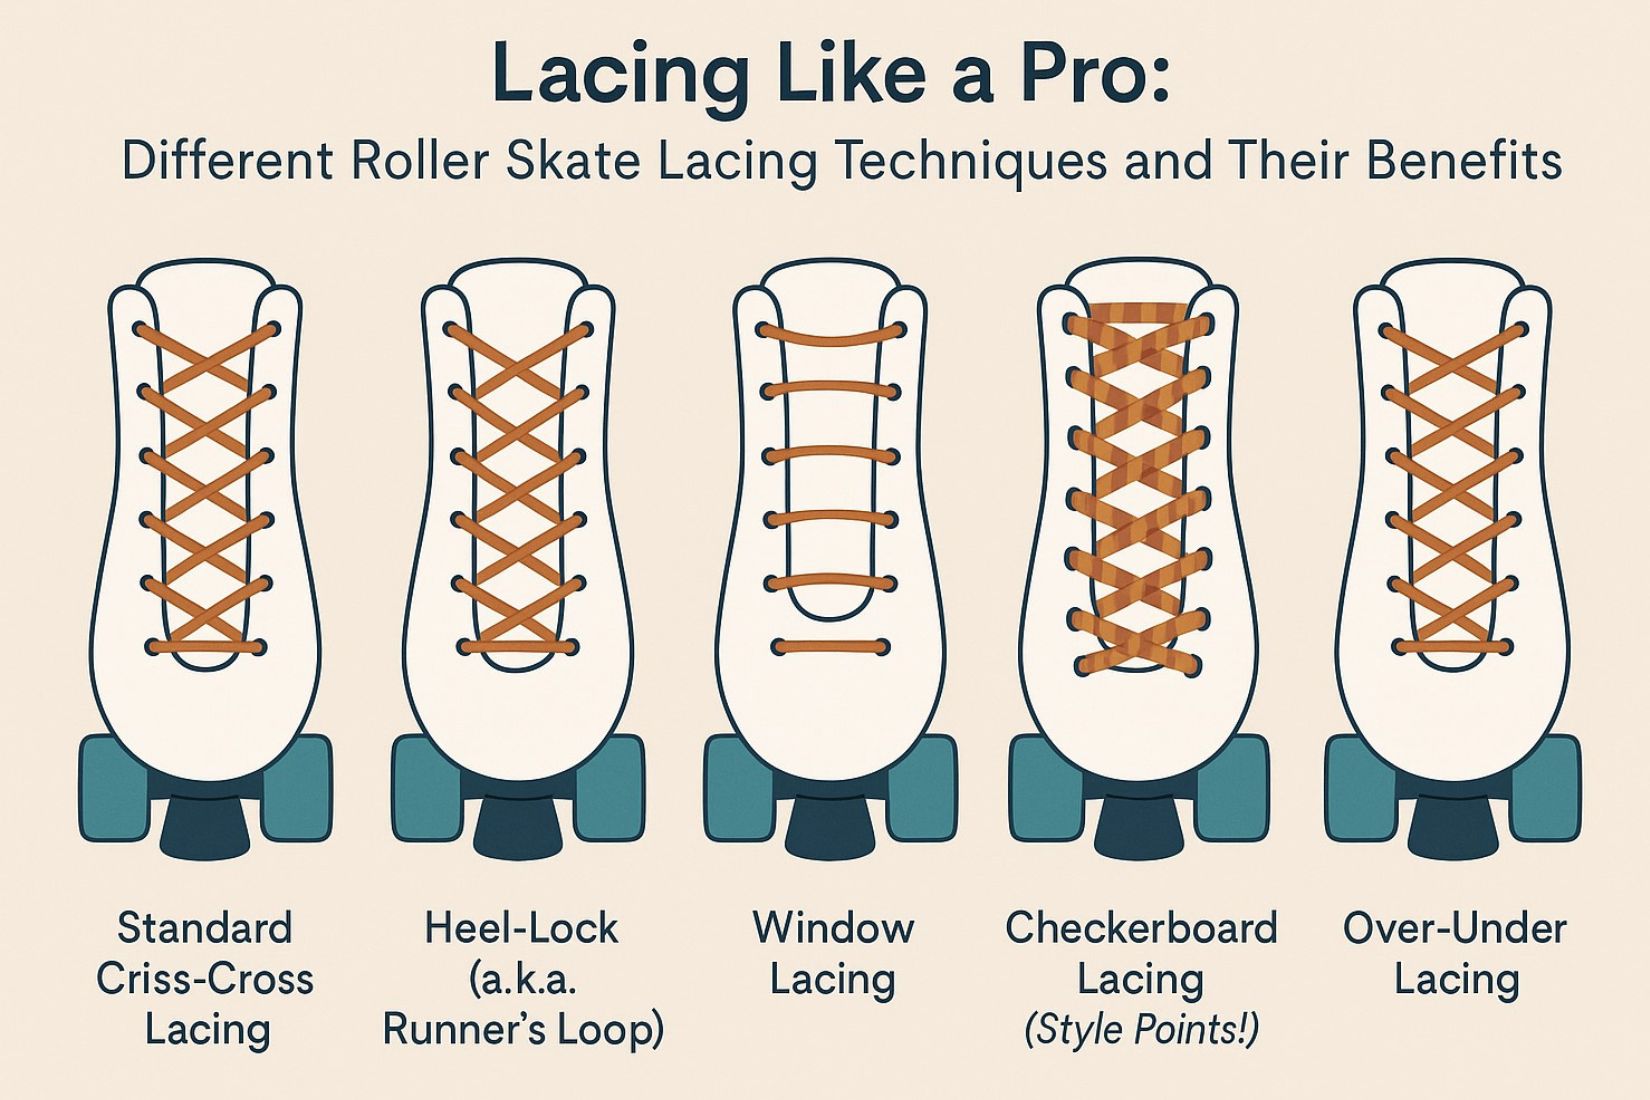
Standard lacing often fails to stop your heel from lifting during aggressive stops or sharp turns. The heel-lock technique creates a mechanical loop that pulls your heel down firmly.
Who Needs a Heel-Lock Technique
- Speed skaters requiring maximum power transfer
- Aggressive skaters performing jumps
- Anyone experiencing consistent heel lift
This method is critical for locking your foot in place to improve responsiveness and reduce fatigue.
Step-by-Step Heel-Lock Instructions
- Lace normally using criss-cross up to the second-to-last eyelet.
- Thread the left lace straight up through the top eyelet on the same side to create a loop.
- Repeat on the right side to form two vertical loops at the top.
- Cross the lace ends and feed each through the opposite vertical loop.
- Pull tight to cinch the ankle collar down around your heel.
- Tie the laces in a standard double knot.
Common Mistake: Skipping the vertical loops eliminates the locking effect entirely.
Window Lacing for Instep Pain Relief
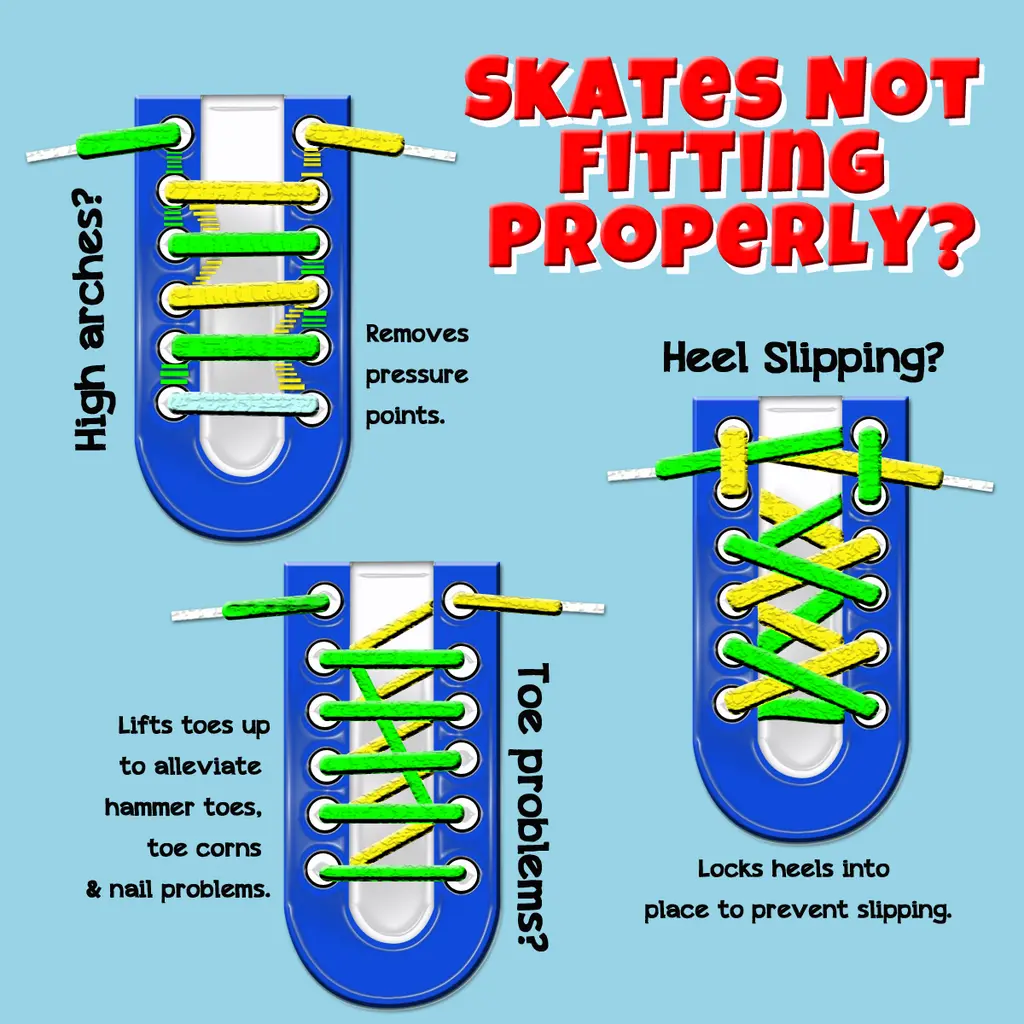
High arches or wide feet can make standard lacing feel like a vice on the top of your foot. Window lacing solves this by creating a pressure-free zone over sensitive areas.
When to Use Window Lacing
- Pain across the instep or dorsal foot
- Skaters with high arches or wide feet
- Long duration skating sessions
This method skips specific eyelets to relieve direct pressure while still securing the ankle.
Step-by-Step Window Lacing Instructions
- Lace using criss-cross up to the eyelets just below where pressure starts.
- Skip the next set of eyelets completely to create your window.
- Cross the laces directly to the next available eyelets above the gap.
- Continue lacing to the top using your preferred method.
Example: If eyelets three and four press on your arch, lace through one and two then jump to five and six.
Warning: Do not skip too many eyelets or you will lose essential ankle support.
Over-Under Lacing for a Flatter Fit
Tired of laces that constantly twist or flop around? The Over-Under pattern keeps laces flat against the tongue and resists loosening during movement.
Benefits of Over-Under Pattern
- Laces stay flat and neat against the tongue
- Resists loosening during active skating
- Reduces pressure points by varying pull angles
This technique is excellent for inline skaters who need a clean and secure fit.
Step-by-Step Over-Under Instructions
- Start with standard inside-out threading at the bottom eyelets.
- Pass the left lace over the tongue to the right side and thread from outside in.
- Pass the right lace under the left lace and into the next right-side eyelet.
- Alternate by sending the right lace over and the left lace under for the next row.
- Continue this alternating pattern to the top and tie securely.
Expert Note: This method uses slightly more lace length so ensure yours are long enough before starting.
Checkerboard Lacing for Style and Function

Want your skates to stand out visually while maintaining performance? Checkerboard lacing delivers a bold look with improved tension distribution.
Who Should Try Checkerboard Lacing
- Artistic skaters needing presentation flair
- Fashion-focused roller enthusiasts
- Anyone wanting a custom appearance
This pattern offers more than just aesthetics by balancing tension across the boot.
Step-by-Step Checkerboard Instructions
- Begin with a standard criss-cross at the bottom section.
- Reverse the cross direction at the next eyelet row.
- Alternate the direction at every single row moving upward.
- Keep entries from the outside to maintain symmetry throughout.
- Tie at the top once the pattern is complete.
Pro Tip: Use contrasting lace colors like black and white for maximum visual impact.
Match Lacing Technique to Skating Style
Your specific discipline dictates whether you need extreme tightness or flexible comfort. Choosing the right strategy enhances your performance significantly.
Inline Skates Require Tight Lockdown
- Tension: Extremely tight for power transfer
- Priority: Control and safety
- Best Techniques: Heel-Lock combined with Over-Under
Inline skates demand a rigid fit to maximize every stride and stop effectively.
Quad Roller Skates Need Balance
- Tension: Moderate to snug
- Priority: Flexibility and comfort
- Best Techniques: Window lacing or Criss-Cross
Recreational quads do not need extreme tightness so focus on comfort for long sessions.
Aggressive and Speed Skating Demands Stability
- Tension: Very tight throughout
- Priority: Ankle stability
- Best Techniques: Heel-Lock is mandatory
Heel slippage wastes energy so lock your foot down to maximize push efficiency.
Artistic and Freestyle Focus on Precision
- Tension: Variable based on routine
- Priority: Aesthetic and fine control
- Best Techniques: Checkerboard or Over-Under
Match your lacing to your outfit or routine for a professional stage presence.
Troubleshoot Common Lacing Problems
Even with the right technique issues can arise during your session. Here is how to solve common problems quickly.
Fix Heel Slippage Immediately
If your heel lifts when you stop standard lacing is insufficient. Re-lace using the heel-lock technique and ensure you use the top eyelets to form vertical loops.
Relieve Top-of-Foot Pain
Instep pain means laces press too hard on your arch. Re-lace using the window method to skip eyelets over the painful area while keeping the ankle tight.
Stop Laces from Twisting
Twisted laces bunch up and create pressure points. Restart with the Over-Under pattern to keep laces flat and aligned throughout your skate.
Solve Short Lace Issues
If you cannot reach the top eyelet lace to the second-to-top hole and tie there. This provides enough support without straining the lace length.
Final Lacing Checklist Before You Skate
Run through this quick inspection before hitting the rink or pavement. Ensure your skates feel snug but not tight with no numbness or pinching.
- Check that your heel stays planted when you walk
- Verify laces are flat and straight with no twisting
- Confirm your knot is double-tied to prevent loosening
- Inspect laces for fraying or wear near eyelets
If anything feels off re-lace immediately because five minutes now prevents pain later.
Frequently Asked Questions About Roller Skate Lacing
How tight should roller skate laces be?
Laces should feel snug without causing numbness or pinching. Inline skates require tighter tension for power transfer while quad skates need moderate snugness for comfort.
Why do my heels keep slipping out of my skates?
Heel slippage usually means you need a heel-lock technique. This method creates a mechanical loop at the top eyelets that pulls your heel down firmly.
What is the best lacing method for high arches?
Window lacing is best for high arches as it skips eyelets over the instep. This relieves direct pressure on the top of your foot while maintaining ankle support.
Can I mix different lacing techniques together?
Yes you can combine methods like using window lacing for the mid-foot and heel-lock at the top. Mixing techniques allows you to customize fit for your specific foot shape.
How often should I replace my skate laces?
Replace laces when you see fraying or wear near the eyelets. Worn laces can break during use causing loss of control and potential injury.
Key Takeaways for Lacing Roller Skates Effectively
Mastering how to lace roller skates depends on your foot shape and skating goals. Start at the bottom with even threading and choose a pattern that addresses your specific needs.
Use criss-cross for daily skating and add a heel-lock if you experience slippage. Try window lacing for instep pain and select Over-Under for a flatter more secure fit.
Your skates should feel like an extension of your body rather than a source of pain. Apply these techniques today to enjoy smoother safer and more comfortable skating sessions.