Shoelace Lacing Styles: Quick Guide
Your shoes might fit perfectly, yet something feels off because the standard lacing causes pressure or slip. Discovering new ways to lace shoelaces can instantly fix discomfort while upgrading your sneaker game.
This guide reveals ten distinct methods to solve specific foot issues and boost your style. You will learn step-by-step instructions for techniques ranging from heel locks to decorative patterns.
Fix Top-of-Foot Pressure with Crisscross Lacing

The classic crisscross method remains the most popular choice for daily wear due to its simplicity. It distributes tension evenly across the top of your foot for a balanced feel.
How to Execute the Classic Cross
- Insert both lace ends from the inside out through the bottom eyelets.
- Cross the right end over to the left eyelet above and thread it through.
- Repeat this crossing pattern until you reach the top eyelets.
- Tie your knot securely to finish the look.
This approach works best on shoes with an even number of eyelet pairs. It provides a reliable fit for almost any casual or athletic shoe.
When to Adjust This Method
- Skip lower eyelets if you feel tightness on your instep.
- Use flat laces to prevent the cross points from shifting.
- Ideal for sneakers, canvas shoes, and casual boots.
Pro Tip: If the standard cross feels too tight, start lacing from the second set of eyelets instead of the bottom pair.
Achieve a Minimalist Look with Straight Bar Lacing

Straight bar lacing offers a clean, horizontal aesthetic that eliminates visible diagonal crosses. This style reduces friction on the top of the foot significantly.
Steps for the Clean Bar Pattern
- Thread both ends from the inside out through the lowest eyelets.
- Pull the left end straight across to the opposite eyelet and insert it.
- Run the right end vertically up the inside to the next available eyelet.
- Repeat the horizontal cross and vertical rise until finished.
The result is a series of parallel bars that look sleek on formal footwear. This method keeps the tongue centered and reduces hot spots.
Best Applications for Bar Lacing
- Oxford dress shoes and formal leather boots
- Situations requiring a tidy, uniform appearance
- Feet sensitive to diagonal pressure points
Warning: Avoid this style for high-impact sports as it offers less ankle lockdown than other methods.
Secure High-Tops with Ladder Lacing
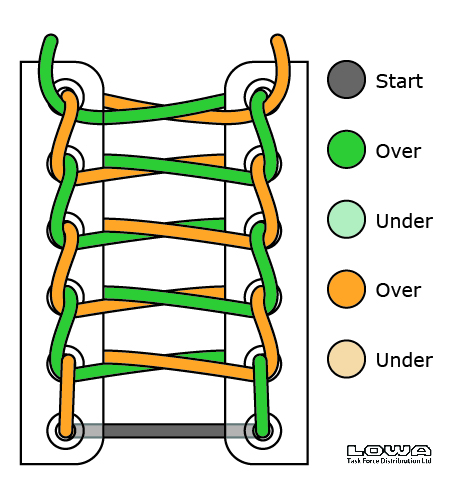
Ladder lacing creates a robust, industrial look that locks high-top shoes in place. The pattern resembles the rungs of a ladder running up the shoe.
Building the Ladder Structure
- Start by threading laces from inside out at the bottom eyelets.
- Cross both ends and feed them straight up the outside of the next eyelets.
- Cross them again horizontally to form the next rung of the ladder.
- Continue this up-and-across motion to the top eyelets.
This technique creates a very tight and supportive structure ideal for rugged activities. It prevents the laces from loosening during movement.
Ideal Footwear for Ladder Style
- Combat boots and hiking footwear
- Skate shoes needing extra lateral stability
- Heavy-duty work boots
Pro Tip: Pair this method with flat, wide laces to maximize the visual impact of the ladder rungs.
Prevent Lace Sag with Zipper Lacing

Zipper lacing creates a staggered, interlocking pattern that looks like a zipper track. It provides smooth tightening without the bulk of traditional knots.
Creating the Zipper Effect
- Thread laces from the inside out through the bottom eyelets.
- Cross one end over to the second eyelet on the opposite side.
- Run the other end straight up its own side to the matching eyelet.
- Alternate crossing and rising to form the staggered pattern.
The resulting interlock keeps tension consistent from toe to ankle. This method minimizes sagging in the middle of the shoe.
Why Choose the Zipper Pattern
- Distributes pressure evenly across narrow feet
- Reduces stress on eyelets to prevent breakage
- Perfect for tight-fitting athletic shoes
Note: This technique works best on shoes with an odd number of eyelet pairs for proper alignment.
Eliminate Heel Slip with Loop Lock Lacing
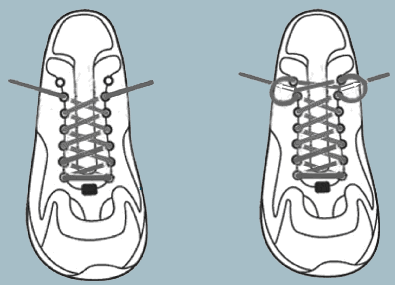
Heel slippage causes blisters and instability, but loop lock lacing solves this with a simple mechanical advantage. It creates a secure anchor around your ankle.
Adding Locking Loops
- Lace the shoe normally using the crisscross method to the second-to-last eyelet.
- Create a small loop on each side by wrapping the lace around itself.
- Cross the free ends through the opposite loops you just created.
- Pull tight to cinch the heel back before tying the final knot.
This creates a snug fit that holds your heel firmly in the heel cup. You get a custom fit without cutting off circulation.
Who Benefits Most from Loop Lock
- Runners experiencing heel lift
- Hikers navigating steep terrain
- Individuals with narrow heels
Expert Tip: Combine this with elastic laces for a dynamic fit that adapts to your stride.
Master the Runner’s Loop for Stability

The runner’s loop, also known as heel lock lacing, is a variation designed specifically for athletic performance. It utilizes the top eyelets to create a locking mechanism.
Executing the Runner’s Loop Technique
- Lace normally until you reach the second-to-last set of eyelets.
- Feed each lace end straight up the same side to the top eyelet.
- Cross the laces and thread them down through the loops you formed.
- Pull firmly to tighten the lock around your ankle.
- Tie your standard bow to secure everything.
This method cinches the midfoot while locking the heel securely in place. It is a favorite among trail runners and marathoners.
Key Advantages of Heel Lock
- Prevents blisters caused by friction
- Allows adjustable tightness in the midfoot
- Commonly used in racing and trail running
Avoid: Over-tightening the lock, which can lead to numbness or restricted blood flow.
Make a Statement with Star Lacing
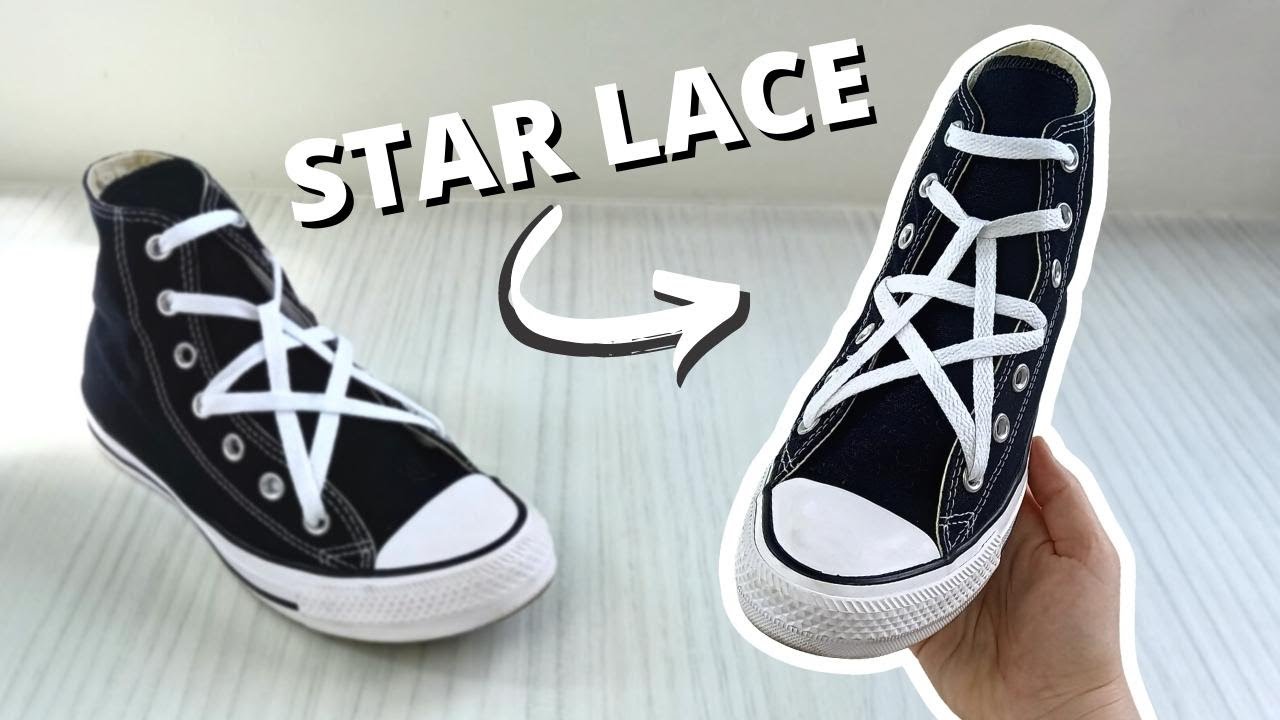
Star lacing turns your sneakers into a fashion statement with a bold, radiating pattern. It is purely decorative but adds a unique flair to any outfit.
Designing the Star Shape
- Thread laces from inside out at the bottom eyelets.
- Cross and insert them into the second eyelet up on each side.
- Bring each end straight up the outside to the top eyelet.
- Cross diagonally down through all remaining open eyelets.
The result is a dramatic X or starburst shape across the face of the shoe. This look draws attention and showcases custom sneakers effectively.
Best Uses for Star Lacing
- Sneaker customizations and limited-edition releases
- Stage performances or photo shoots
- Casual wear where style outweighs function
Caution: This pattern creates high friction points, so use durable laces to prevent snapping.
Add Flair with Bowtie Lacing
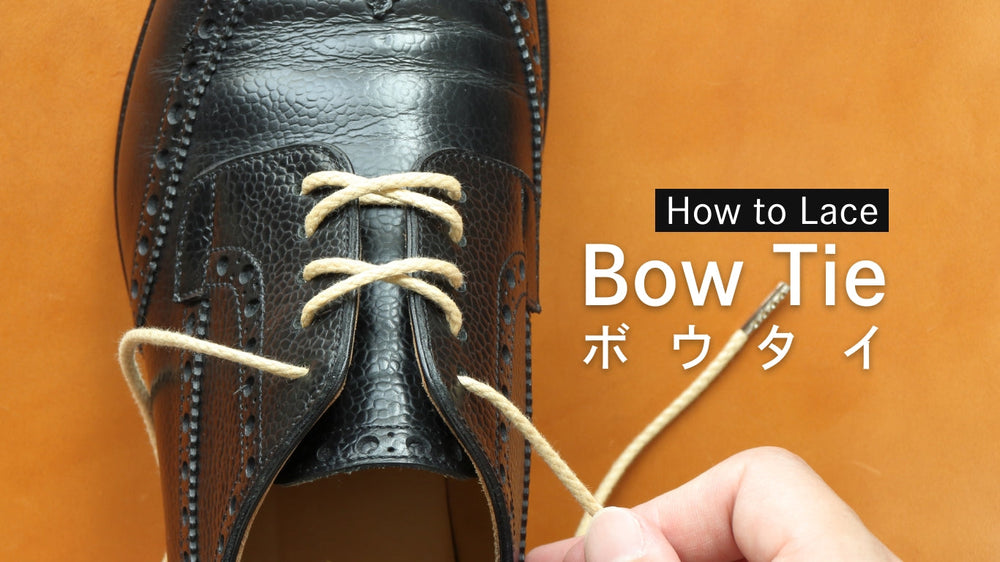
Bowtie lacing incorporates small loops at every intersection to mimic the look of tiny bowties. It is an intricate style for those who love detail.
Crafting the Bowtie Loops
- Begin at the bottom by threading laces from inside out.
- Cross laces into the second eyelet up on the opposite side.
- Form a small loop with each end before crossing to the next eyelet.
- Feed the free ends through the next set of eyelets to lock the loops.
Each crossing point features a symmetrical loop that adds texture and depth. This method requires patience but delivers a highly distinctive result.
Considerations for Bowtie Style
- Best suited for display purposes or static events
- Requires longer than average laces to complete
- Time-consuming to lace initially
Try This: Use contrasting lace colors to make the bowtie loops pop against the shoe color.
Hide Knots for a Clean Finish
Hidden knot lacing keeps the tongue area free of bulky knots and loose ends. It offers a streamlined silhouette perfect for minimalist aesthetics.
Concealing the Knot Neatly
- Lace your shoes using crisscross or straight bar methods.
- Instead of tying on top, thread the ends into the top eyelets from outside in.
- Tie a simple knot underneath the tongue or inside the shoe.
- Tuck any excess lace material into the side of the shoe.
This technique ensures nothing distracts from the clean lines of your footwear. It also prevents tripping hazards from loose lace ends.
Ideal Scenarios for Hidden Knots
- Minimalist running shoes and slip-on hybrids
- Shoes with internal storage pockets for laces
- Professional settings requiring a polished look
Bonus: This method keeps laces from coming undone during activity since the knot is protected.
Create Custom Designs with Grid Lacing

Grid lacing uses two sets of laces to weave a checkerboard pattern across your shoe. It transforms your footwear into a canvas for color and creativity.
Weaving the Grid Pattern
- Lace one color horizontally using the straight bar method.
- Weave a second contrasting color vertically through the horizontal bars.
- Alternate going over and under to create a woven grid effect.
- Secure both sets of laces inside the shoe or at the top.
This complex pattern allows for endless color combinations and designs. It is the ultimate way to personalize a plain pair of sneakers.
Customization Ideas for Grid Lacing
- Mix brand colors to show team spirit
- Represent schools or organizations with specific hues
- Stand out in a crowd with neon or metallic laces
Tip: Use waxed laces to prevent fraying during the complex weaving process.
Frequently Asked Questions About Shoelace Techniques
Which lacing method is best for wide feet?
Straight bar lacing is often best for wide feet because it reduces pressure on the top of the foot. The horizontal bars distribute tension evenly without creating tight diagonal points.
How do I stop my heels from slipping out of my shoes?
Use the loop lock or runner’s loop method to create a secure anchor around your ankle. These techniques utilize the top eyelets to cinch the heel cup tightly against your foot.
Can changing my lacing style improve running performance?
Yes, proper lacing can prevent blisters, reduce fatigue, and improve stability during runs. Techniques like the heel lock provide the secure fit needed for high-impact activities.
What type of laces work best for decorative patterns like Star or Grid?
Flat or waxed laces work best for decorative patterns because they hold their shape and reduce friction. Round laces may slip out of place more easily in complex weaves.
Is it difficult to learn these new ways to lace shoelaces?
Most methods are easy to learn with a little practice and no special tools required. Start with simple variations like straight bar before attempting complex weaves like the grid pattern.
Key Takeaways for Mastering Shoelace Styles
Exploring different ways to lace shoelaces offers immediate benefits for both comfort and personal style. Whether you need the heel stability of a runner’s loop or the clean look of straight bar lacing, there is a technique for every need. Start by identifying your specific foot issue or style goal, then experiment with the methods outlined above.
You do not need expensive gear to upgrade your shoes; simply changing your lacing pattern can transform your experience. Try one new method today to see how a small adjustment can make your footwear feel brand new.