How to Make a Lace Frontal Wig
Creating a natural-looking hairline requires precision, patience, and the right technique for attaching individual strands to a sheer base. Learning how to make a lace frontal wig allows you to customize density, hair direction, and skin-tone matching for a flawless finish that pre-made units cannot match.
This guide walks you through every step, from securing your pattern to mastering the lark’s head knot for realistic growth. You will discover professional ventilation methods, adhesive application tips, and essential maintenance advice to ensure your handmade piece lasts.
Prepare Your Wig Block and Pattern
Secure the Pattern to the Block
Start by transferring your wig pattern from a model head to a foam wig block. Stuff the inside of the pattern with padding to maintain its shape and prevent sagging during construction. Use balled straight pins to anchor the main sections firmly in place.
Switch to small straight pins to trace the exact hairline path once the base is secure. These finer pins allow for greater accuracy when defining curves, temples, and sideburn areas. Work slowly around the entire perimeter to ensure the pattern lies flat without wrinkles.
Cut and Dye the Lace Base
Measure and cut a piece of lace or tulle slightly larger than the frontal section of your pattern. Always leave extra material, about 1 to 1.5 inches beyond the hairline, to allow room for adjustments and folding. This buffer prevents tearing during pinning.
Dye the lace if it does not match your skin tone before attaching it. Undyed lace often appears white, making the mesh visible on darker complexions. Tea dyeing is an effective method where you steep black tea in hot water and submerge the lace for 5 to 10 minutes.
Mount and Fit the Lace Front
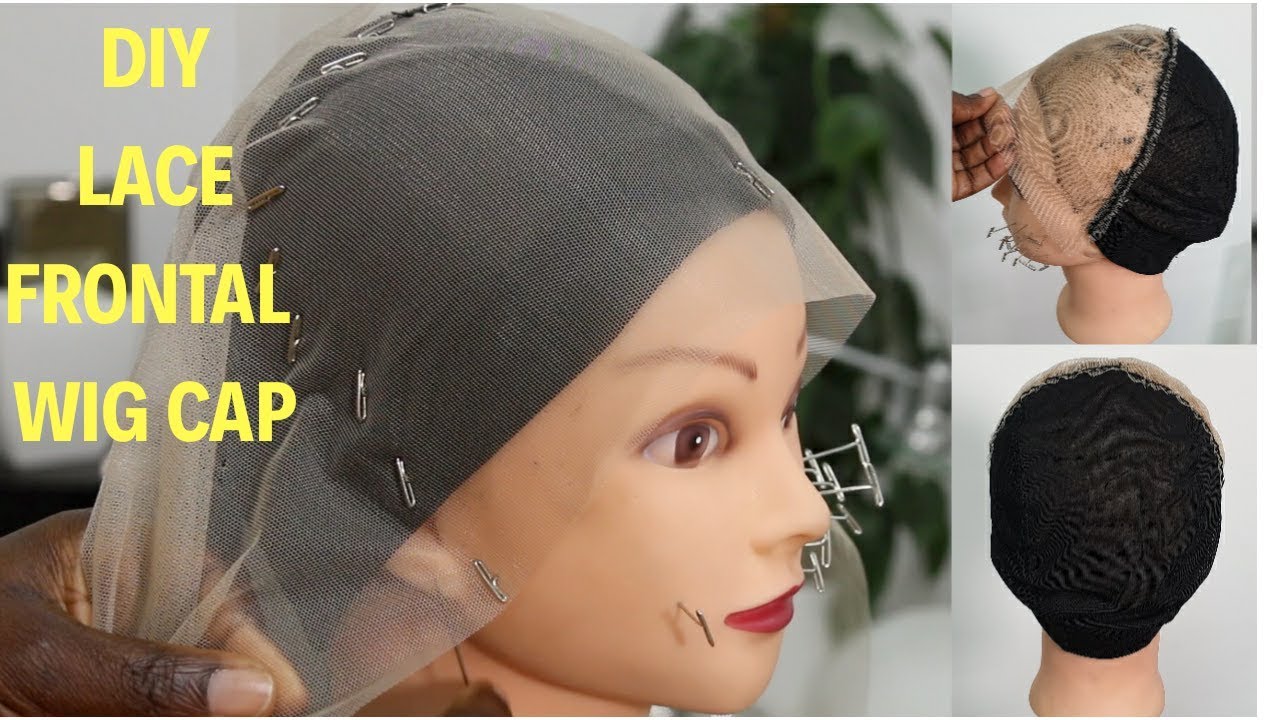
Pin the Lace Smoothly to the Pattern
Drape the dyed lace over the secured pattern on the wig block. Begin by anchoring the center front hairline with balled pins, then work outward toward the temples. Pull the lace taut as you go to avoid ruffles or loose sections.
Smooth the lace from front to back, securing it along the perimeter. In the rear sections, fold any excess lace flat and sew the open edge shut with a standard needle and thread. This creates a clean foundation for ventilating.
Test the Fit Before Ventilating
Remove all pins and lift the lace cap off the block to check the fit. Try it on a head form or your own head to ensure the hairline follows your natural forehead curve. Make necessary adjustments by re-pinning and re-trimming the lace before knotting begins.
Confirming the fit early prevents costly corrections after hours of knotting. A proper fit ensures the wig sits comfortably and looks natural when worn.
Ventilate the Lace Front with Hair
Master the Lark’s Head Knot Technique
Ventilating is the core process of how to make a lace frontal wig. Use a ventilating needle with a hooked tip to pull hair through the mesh and form secure knots. Hold a bundle of hair, fold it into a loop, and hook the needle through a lace hole.
Catch a few strands from the loop, pull them halfway through to form a new loop, then thread the loose ends through that loop and tighten. This forms a lark’s head knot, which lies flat against the lace without bulging. Never overload the needle, as this weakens the knot.
Build Density Gradually from Front to Back

Start ventilating at the very front edge of the hairline using a larger-numbered hook to pick up more hair strands per knot. Place knots close together to mimic natural follicle clusters and create high density.
Switch to a smaller hook as you move 1/4 to 1/2 inch behind the hairline. Increase spacing between knots and reduce hair volume per knot to create a natural gradient. Further back, scatter knots randomly to simulate how real hair thins toward the scalp.
Estimate Time and Finish Ventilation
Ventilating is time-intensive, with one square inch taking 3 to 6 hours on average. A full frontal may require 20 to 40+ hours total, so work in focused sessions to maintain quality. Inspect the piece under good lighting for gaps or loose knots once complete.
Trim excess lace carefully, leaving 1/4 to 1/2 inch of lace beyond the last row of knots. This margin allows for secure gluing or taping during wear without exposing the knots.
Convert an Existing Wig to Lace Front
Attach Lace to a Stock Wig Cap
Flip a standard wig inside out and place it on the wig block to upgrade it. Cut and dye a piece of tulle to match the front hairline area. Stitch the lace along the front edge of the wig cap using a sewing needle and thread for a snug join.
Flip the wig right-side out so the lace front is attached but empty. This new section is now ready for ventilation. This method saves time compared to building a full cap from scratch.
Ventilate Over the New Lace Section
Use the lark’s head knot method to add hair to the newly attached lace. Start at the front edge with a large hook for density, then work backward while decreasing hook size. Pull hair from a donor wig or use loose human fibers.
Ventilate only the lace portion, typically 4 to 6 inches deep from the front. Trim excess lace and test the fit once done. Secure temporarily with toupee tape to evaluate hold before permanent wear.
Apply and Secure Your Lace Frontal

Prep Skin for Long-Lasting Hold
Cleanse the forehead, temples, and hairline with a non-oily soap before applying your handmade wig. Oils and residues prevent adhesives from bonding properly, so rinse thoroughly and pat dry.
Apply a scalp protector just below your natural hairline to create a barrier. This shields skin from glue irritation and stops natural oils from breaking down the adhesive. Let it dry completely until clear and non-tacky.
Choose Adhesive: Glue or Tape
For Liquid Adhesive:
1. Apply a thin, even layer along the glued area of your scalp.
2. Wait until it becomes tacky, which usually takes 3 to 5 minutes.
3. Speed up drying with a cool blow dryer, never using heat.
4. Align the lace front with your glued line and press down gently.
5. Hold in place for 30 seconds, then apply light pressure along the entire front.
For Double-Sided Wig Tape:
1. Cut tape strips to fit your hairline.
2. Stick one side to your clean, dry forehead.
3. Align the lace edge with the tape border.
4. Peel off the backing and press the lace down, holding each section for 30 seconds.
5. Smooth from center outward to eliminate air bubbles.
Blend and Style the Final Look
Use foundation or concealer to blend the lace border into your skin tone if it remains visible. Match the shade to your forehead and set with translucent powder for a seamless look.
Style the wig as desired, whether parting it, curling it, or pulling it into a high ponytail. Avoid excessive tugging or heat near the glued edge to preserve the bond.
Maintain and Wear Safely
Follow Recommended Wear Cycles
Do not wear even the best handmade lace front indefinitely. Wear time should not exceed 6 to 8 weeks to avoid matting, odor, and scalp irritation. While some claim up to 10 weeks, shorter cycles are safer.
Gently wash the wig with sulfate-free shampoo and condition it after removal. Clean your scalp, comb natural hair, and reapply after a short break to keep both wig and scalp healthy.
Prevent Common Issues
- Ruffled lace: Repin during construction, smoothing from center to edges.
- Unnatural hairline: Vary knot density, keeping it tight in front and sparse behind.
- Adhesive fails: Recheck skin prep for oil and ensure proper drying time.
- Visible mesh: Always dye lace to match skin tone before ventilating.
Final Tips for a Pro Finish

- Use quality hair: Human hair offers the most realism but requires more maintenance.
- Invest in good tools: A sharp ventilating needle and proper wig block make a huge difference.
- Work in good light: Natural or LED lighting helps spot gaps and uneven knots.
- Take breaks: Fatigue leads to sloppy knots, so work in 1 to 2 hour sessions.
- Label hooks: Mark your ventilating needles by size to avoid confusion.
Frequently Asked Questions About Making Lace Frontal Wigs
How long does it take to make a lace frontal wig?
Ventilating is time-intensive, with one square inch taking 3 to 6 hours depending on density. A full frontal project often requires 20 to 40+ hours of focused work to complete properly.
What is the best knot for lace front wigs?
The lark’s head knot is the standard for wig making due to its durability and low profile. It lies flat against the lace and mimics natural hair growth when tied correctly.
Can I dye the lace to match my skin tone?
Yes, dyeing lace is essential for a natural look on many complexions. Tea dyeing is a common and effective method to turn white or off-white lace into a skin-tone match.
How often should I remove my lace frontal wig?
You should remove your wig every 6 to 8 weeks to clean both the unit and your scalp. Prolonged wear beyond this period increases risks of irritation, matting, and hygiene issues.
Why does my lace look ruffled after pinning?
Ruffles occur when lace is not pulled taut during the pinning process. Smooth the lace from the center outward and secure it tightly to maintain a flat surface for ventilation.
Key Takeaways for How to Make a Lace Frontal Wig
Learning how to make a lace frontal wig gives you full control over density, hairline shape, and overall realism. Success relies on precise pattern preparation, mastering the lark’s head knot, and varying hook sizes to create natural gradients.
Proper skin preparation and adhesive timing are critical for long-lasting wear and comfort. Start with small sections to practice your knotting rhythm before attempting a full build.
Gather your tools, prepare your workspace with good lighting, and begin your journey to custom wig creation today. With patience and practice, you can achieve salon-quality results at home.