How to Lace Jump Boots
Jump boots demand a precise lacing technique to ensure foot stability, prevent blisters, and meet strict military appearance standards. Using the wrong method can lead to slippage, discomfort, or failure during inspections and high-intensity operations.
This guide details exactly how to lace jump boots using proven techniques like ladder, double back, and straight-bar methods. You will learn step-by-step instructions, material selection tips, and compliance rules to keep your gear secure and regulation-ready.
Execute Ladder Lacing for Superior Lockdown
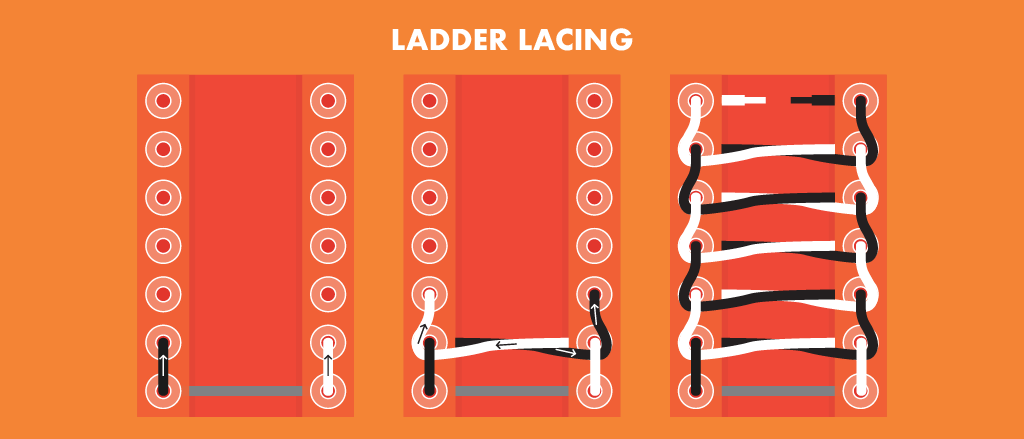
Ladder lacing is the gold standard for jump boots because it creates a rigid structure that locks the foot in place. This method distributes pressure evenly across the instep while providing the clean, parallel lines required for military dress codes.
Step-by-Step Ladder Lacing Instructions
- Create the base bar: Thread the lace straight across the bottom eyelets from the inside out so both ends emerge on the exterior.
- Run vertical segments: Feed each lace end straight up through the next eyelet on the same side, moving from inside to outside.
- Cross and loop under: Bring each lace across the tongue and loop it underneath the vertical segment on the opposite side to form a horizontal bar.
- Repeat the pattern: Continue moving upward with vertical runs followed by cross-loops until you reach the top eyelets.
- Secure the knot: Finish with a tight double knot or surgeon’s knot to prevent loosening during movement.
Pro Tip: Maintain consistent tension on every horizontal bar. Uneven pulling creates pressure points that cause pain during long marches.
Why This Method Dominates Tactical Use
- Zero slippage: The locking mechanism prevents the foot from sliding forward or sideways.
- Even weight distribution: Reduces hot spots on the top of the foot during extended wear.
- Regulation approved: Meets Army and Marine Corps standards for neatness and uniformity.
This technique works best with flat or waxed laces that lie flush against the boot tongue without bulging.
Apply Double Back Lacing for Extreme Security

Double back lacing offers the highest level of security for paratroopers and special operations personnel who cannot afford loose boots. This method adds extra anchor points that resist loosening under heavy loads or rapid direction changes.
How to Perform the Double Back Technique
- Start with crisscross: Lace normally from the bottom up through two or three pairs of eyelets.
- Reverse direction: At your chosen anchor point, thread each lace back down through the previous eyelet on the same side.
- Resume upward path: Run the laces up again through the next available eyelets to create a reinforced “Z” pattern.
- Add secondary anchors: Repeat the double-back process higher up the boot if extra security is needed for specific terrain.
- Tie off firmly: Secure the laces at the top with a robust knot that will not slip.
Ideal Scenarios for Double Back Lacing
- Airborne operations: Ensures boots stay tight during parachute exits and landings.
- Rugged terrain: Prevents foot movement inside the boot on uneven ground.
- Heavy load carriage: Keeps the foot stable when carrying rucksacks or tactical gear.
Warning: Avoid over-tightening this method as it can restrict blood flow. Ensure your toes remain warm and responsive after lacing.
Use round or waxed laces for this technique since they withstand the added friction and abrasion better than flat alternatives.
Master Army Straight-Bar Lacing for Inspections

Army straight-bar lacing provides a sharp, professional appearance that minimizes lace friction. This method is the go-to choice for daily duty, formal inspections, and situations where a pristine look is mandatory.
Execution Steps for Straight-Bar Lacing
- Thread the bottom bar: Run the lace straight across the lowest eyelets from the inside so both ends exit underneath.
- Run one side internally: Take the left lace and thread it up the inside of the boot to the next eyelet level.
- Cross to the opposite side: Bring the lace over the tongue and feed it through the right eyelet at the same level.
- Repeat on the other side: Run the right lace up the inside, cross it over, and insert it through the next left eyelet.
- Continue to the top: Alternate sides to create a series of perfect horizontal bars across the front of the boot.
Benefits of the Straight-Bar Method
- Inspection ready: Delivers the cleanest possible look for uniform compliance.
- Reduced wear: Less lace-to-lace friction extends the life of your laces.
- Zone adjustment: Allows you to tighten specific areas without affecting the whole system.
Note: This pattern consumes more lace length than crisscross methods. Ensure you have flat laces long enough to reach the top eyelets comfortably.
Always verify your unit’s specific regulations, as some branches mandate this style for dress boots while allowing others for field use.
Utilize Bow Tie Lacing to Relieve Foot Pressure

Bow tie lacing solves comfort issues for personnel with high arches, wide feet, or top-of-foot pain. This technique creates a “floating” section that bypasses sensitive areas while maintaining security above and below.
How to Create a Pressure-Relief Gap
- Lace to the problem area: Use standard crisscross lacing up to the eyelets just below where you feel pressure.
- Form slack loops: Feed each lace straight up the same side to the next eyelet instead of crossing them, creating a loose loop on each side.
- Skip and re-engage: Bring the laces across above these loops and insert them into the next higher set of eyelets.
- Resume normal lacing: Continue with standard crisscross patterns to the top of the boot.
- Tie securely: The loose loops will remain slack to relieve pressure on the instep.
Who Needs This Lacing Style
- High arches: Prevents the lace from compressing the arch bone.
- Swollen feet: Accommodates volume changes during long missions or hot weather.
- Wide forefoot: Allows the mid-panel of the boot to expand slightly for a better fit.
Pro Tip: You can combine this gap method with ladder or straight-bar lacing above and below the pressure point for both comfort and compliance.
This approach is perfect for long-duration wear where comfort takes priority over strict aesthetic uniformity.
Select the Correct Laces for Your Mission

The effectiveness of your lacing technique depends heavily on the quality and type of lace you choose. Poor materials can undermine even the best lacing job.
Comparison of Lace Types
| Lace Type | Best Application | Durability | Visual Profile |
|---|---|---|---|
| Flat | Ladder and Army lacing | Medium | Clean, uniform |
| Round | Double back and rugged use | High | Bulky, tactical |
| Waxed | Wet or muddy conditions | Very High | Polished, slick |
| Reflective | Low-light operations | Medium | High visibility |
Determining Proper Lace Length
- 8-eyelet boots: Require 72 to 80 inches.
- 10-eyelet boots: Require 96 to 108 inches.
- Marine Corps standard: Mandates 108-inch flat laces for 10-eyelet jump boots.
Safety Note: Excessively long laces create tripping hazards and violate uniform standards. Trim or replace them if they extend too far beyond the knot.
Stick to nylon or polyester materials for superior rot resistance and strength. Avoid cotton laces as they stretch when wet and degrade quickly in harsh environments.
Validate Your Lacing Performance
A perfect pattern means nothing if the boot fails during movement. You must test your work to ensure security and comfort before hitting the field.
Post-Lacing Testing Protocol
- Walk and jog in place: Check for any heel lift or side-to-side foot movement.
- Test ankle lock: Your foot should feel glued to the boot with no internal sliding.
- Inspect for pinching: Wiggle your toes and press on the top of the foot to identify tight spots.
- Re-tighten if necessary: Adjust specific sections without redoing the entire pattern if issues arise.
Red Flag: If you need to re-lace within ten minutes of starting, your tension or technique is incorrect.
Simulate tactical movements like squatting, kneeling, and sprinting to ensure the laces stay secure under dynamic stress.
Maintain Laces for Long-Term Reliability
Regular maintenance prevents lace failure and keeps your boots ready for immediate deployment. Neglecting care can lead to sudden breakage during critical moments.
Routine Care Instructions
- Clean after use: Remove laces and brush off dirt, mud, and debris to prevent fiber degradation.
- Inspect monthly: Look for fraying, thinning spots, or weakened fibers near eyelets.
- Replace proactively: Change laces every 6 to 12 months with heavy use, or immediately upon signs of wear.
- Store properly: Keep boots in a dry, shaded area to prevent UV damage and mildew growth.
Quick Fix: Use lace locks or speed hooks for rapid adjustments in the field, though these may not be regulation for formal wear.
Adhere to Military Regulations and Standards
Appearance is as critical as performance in uniformed services. Your lacing method must align with your specific branch’s guidelines.
Branch-Specific Requirements
- U.S. Army (AR 670-1): Permits ladder and straight-bar lacing; bans reflective or colored laces unless authorized.
- U.S. Marine Corps: Requires flat laces with straight-bar or ladder styles; laces must not extend more than one inch beyond the knot.
- Air Force: Allows similar styles but emphasizes neatness and conservative colors like black or coyote brown.
- Navy: Often follows Army standards but check local command directives for variations.
Bottom Line: When in doubt, use ladder lacing with flat black laces as it is universally accepted across branches.
Frequently Asked Questions About Jump Boot Lacing
What is the most secure way to lace jump boots?
Double back lacing provides the highest security by creating multiple anchor points that prevent loosening during extreme physical exertion or airborne operations.
Can I use bow tie lacing for military inspections?
Generally no, as inspections require uniform appearance. Use bow tie lacing for comfort during training or long marches, but switch to ladder or straight-bar for formal inspections.
How often should I replace my boot laces?
Replace laces every 6 to 12 months with heavy use, or immediately if you notice fraying, thinning, or discoloration that indicates weakness.
Are reflective laces allowed in uniform?
Most branches prohibit reflective laces for standard duty unless specifically authorized for low-light operations. Always check your specific branch regulations.
What lace length do I need for 10-eyelet boots?
Standard 10-eyelet jump boots typically require 96 to 108-inch laces, with the Marine Corps specifically mandating 108-inch flat laces.
Key Takeaways for Lacing Jump Boots Effectively
Mastering how to lace jump boots ensures your footwear performs reliably during high-stress operations while meeting strict appearance standards. Choose ladder lacing for daily stability, double back for maximum security, and bow tie for pressure relief based on your specific mission needs.
Select high-quality flat or waxed laces of the correct length and maintain them regularly to prevent failure. Always cross-reference your chosen method with your branch’s uniform regulations to ensure full compliance before stepping out.