Best Way to Lace Sneakers (2026 Guide)
Heel slippage ruins runs while tight laces cause painful pressure on the top of your foot. Finding the best way to lace sneakers solves these issues instantly by matching your pattern to your specific foot shape and activity level.
This guide details exact methods to lock your heel, relieve arch pain, or achieve a sleek aesthetic look. You will learn step-by-step instructions for standard, athletic, and decorative styles to optimize comfort today.
Standard Criss-Cross Lacing for Daily Wear
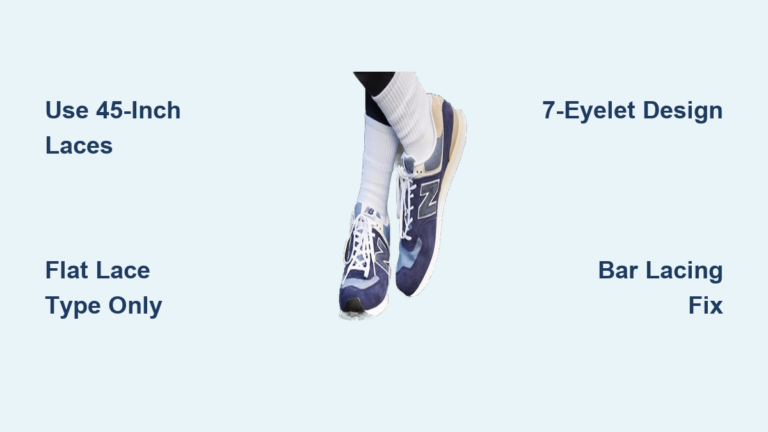
The Criss-Cross method remains the most popular choice because it delivers balanced tension across your entire foot. It works perfectly for casual sneakers and athletic shoes with 6 to 10 eyelets.
How to Execute the Pattern
- Thread both lace ends down through the bottom eyelets from the top until they are even.
- Cross the right lace over the tongue and feed it up through the second eyelet on the left.
- Cross the left lace over the tongue and feed it up through the second eyelet on the right.
- Continue alternating sides until you reach the top pair of eyelets.
- Pull both ends tight and tie a secure bow that allows natural foot movement.
Utilizing the Tongue Loop
Many modern sneakers include a small loop sewn onto the tongue to keep it centered. Pass both laces through this loop before moving to the next eyelet to prevent the tongue from shifting sideways during wear.
Heel Lock Lacing to Stop Slippage
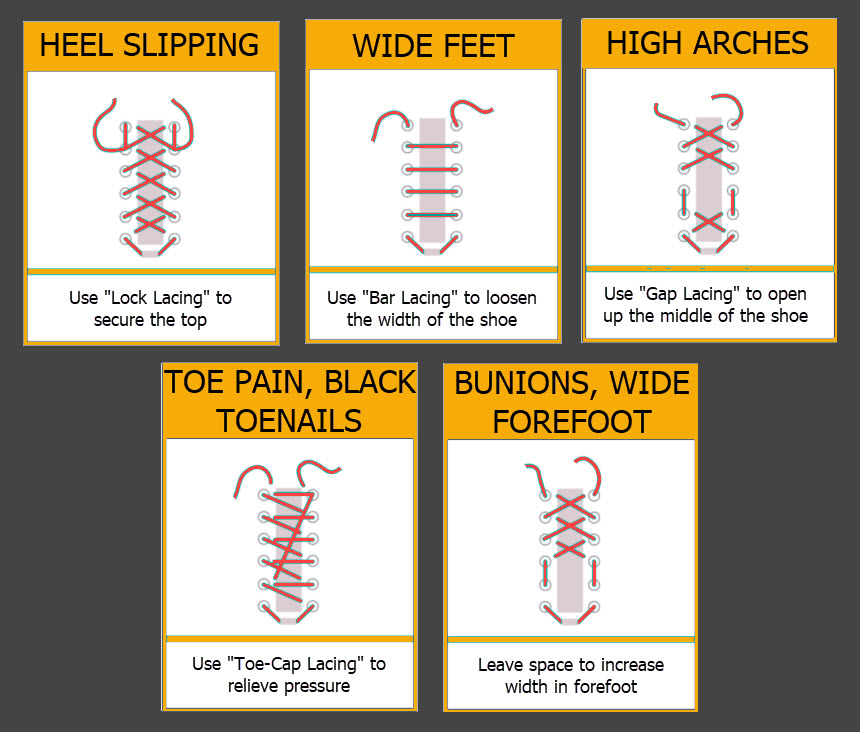
Runners often face heel slippage that causes blisters and instability during long distances. The Heel Lock technique creates a secure pulley system that locks your heel firmly in place.
Step-by-Step Heel Lock Instructions
- Lace your shoe normally using the Criss-Cross method until you reach the second-to-last eyelet.
- Feed the right lace straight up through the top eyelet on the same side to create a small loop.
- Repeat this process on the left side to form a matching loop.
- Cross the right lace end through the left loop and the left lace end through the right loop.
- Pull both ends tight to engage the locking mechanism before tying your final bow.
When to Apply This Method
- Long-distance running or trail running
- Shoes with a wide fit like Altra or Hoka
- Narrow heels that slide inside standard sneakers
This adjustment takes only seconds but dramatically improves stability for narrow ankles or loose-fitting shoes.
Gap Lacing to Reduce Top-of-Foot Pressure

Pain across the instep often results from laces pulling directly against sensitive nerves or bones. Gap Lacing bypasses these high-pressure zones by skipping specific eyelets to create relief.
Creating a Pressure-Free Zone
- Begin lacing normally from the bottom up to the eyelet just below your pain point.
- Run the right lace straight up the same side instead of crossing diagonally.
- Run the left lace straight up the same side to match the right.
- Skip the problematic eyelets entirely and resume crossing diagonally from the next available pair.
- Tie off normally once you reach the top.
Ideal Scenarios for Gap Lacing
- High insteps or swollen feet
- Recovery from foot injuries
- Tight shoes that pinch the top of the foot
This method maintains overall shoe security while eliminating direct compression on sensitive areas.
Parallel Lacing for High Arches
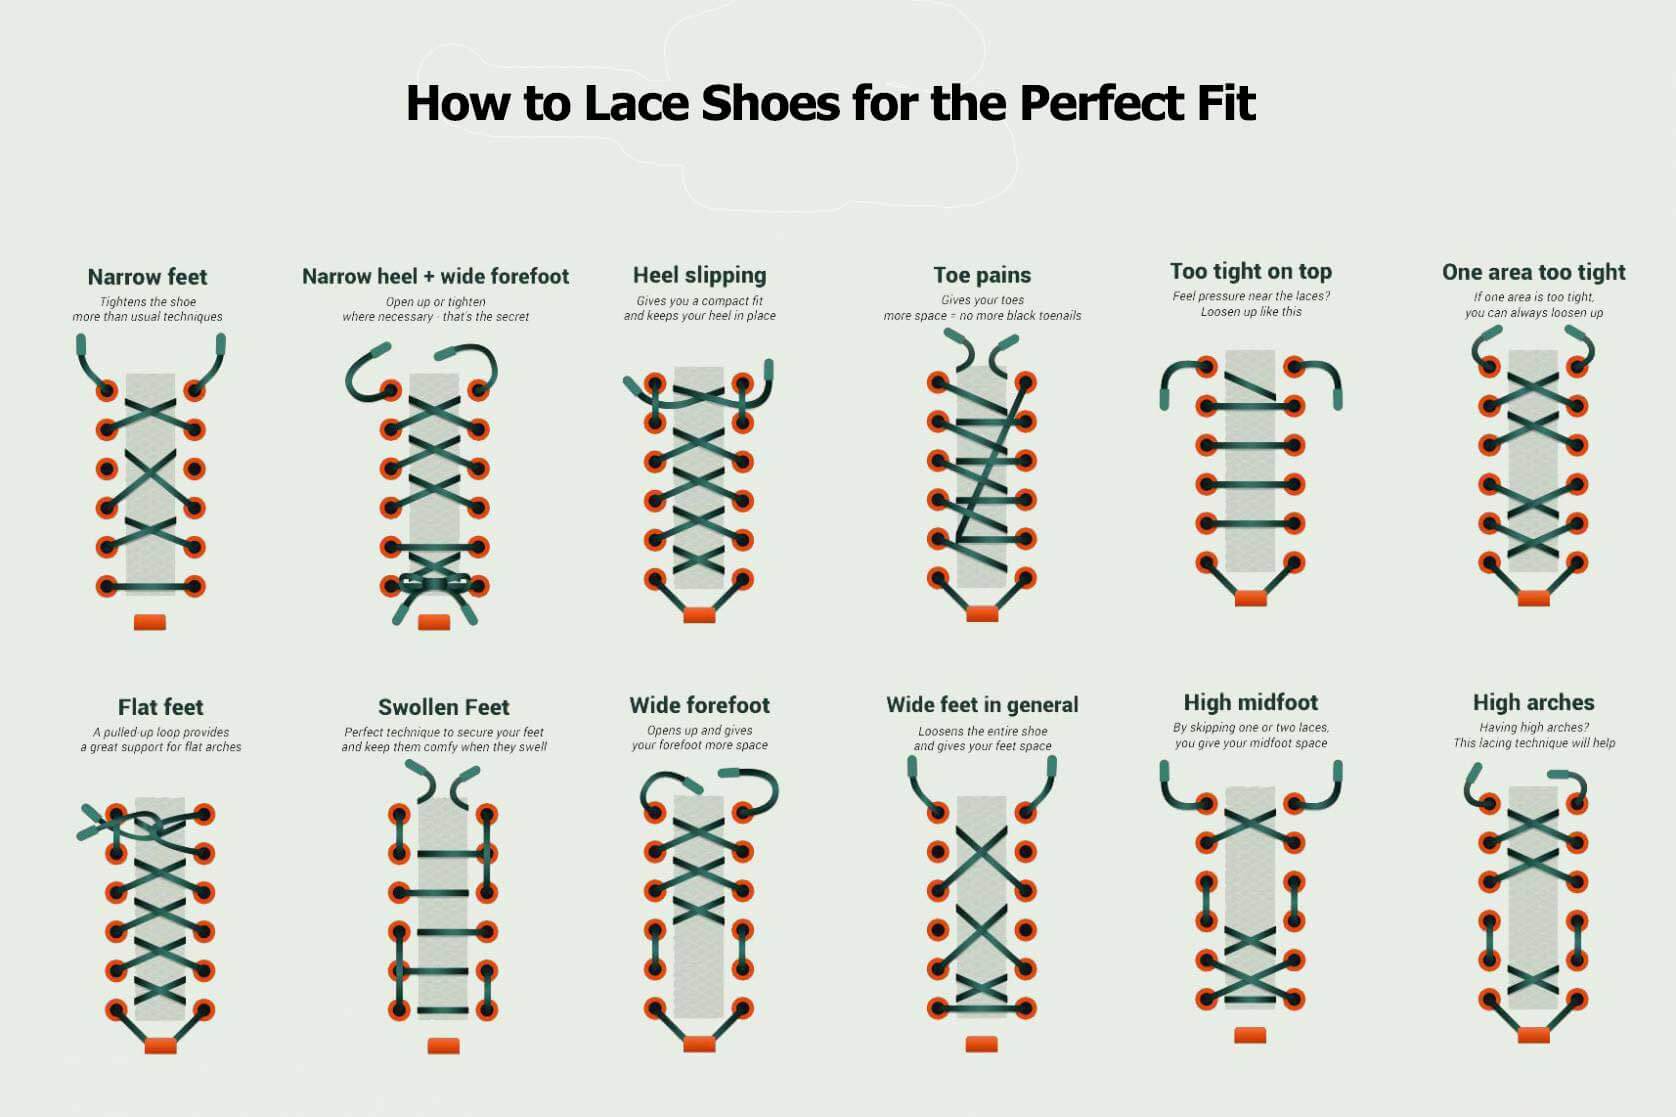
Individuals with high arches often experience pinching when standard diagonal laces pull too tightly across the arch. Parallel Lacing distributes tension evenly to support the natural foot shape.
Executing the Parallel Pattern
- Start by threading the lace from the bottom left eyelet to the bottom right eyelet.
- On the right side, skip the next eyelet and go up two spaces.
- Cross the lace horizontally to the left side at the same height.
- On the left side, skip one eyelet and go up two spaces.
- Repeat this skipping pattern until you reach the top eyelets.
Benefits for Arch Support
- Minimizes pressure points along the arch
- Prevents lace bite at the ankle
- Supports natural foot curvature
The resulting parallel lines avoid aggressive diagonal pulls that cause discomfort for high-arched feet.
Loose Aesthetic Lacing for Style
Streetwear enthusiasts often prefer a relaxed look that offers easy slip-on access without sacrificing style. The Loose Aesthetic method creates a clean silhouette with hidden ends.
Steps for a Clean Look
- Feed both lace ends down through the bottom eyelets leaving small loops.
- Cross the left lace over to the right second eyelet from above without pulling tight.
- Cross the right lace over to the left second eyelet from above.
- Continue this loose alternating pattern up to the top eyelets.
- Bring each lace up through the top eyelet from underneath and tuck excess behind the tongue.
Why This Style Works
- Provides effortless on and off wear
- Creates a breathable non-restrictive fit
- Hides lace ends for a minimalist appearance
This technique is perfect for casual outings where function meets modern fashion aesthetics.
Decorative Lacing for Visual Impact
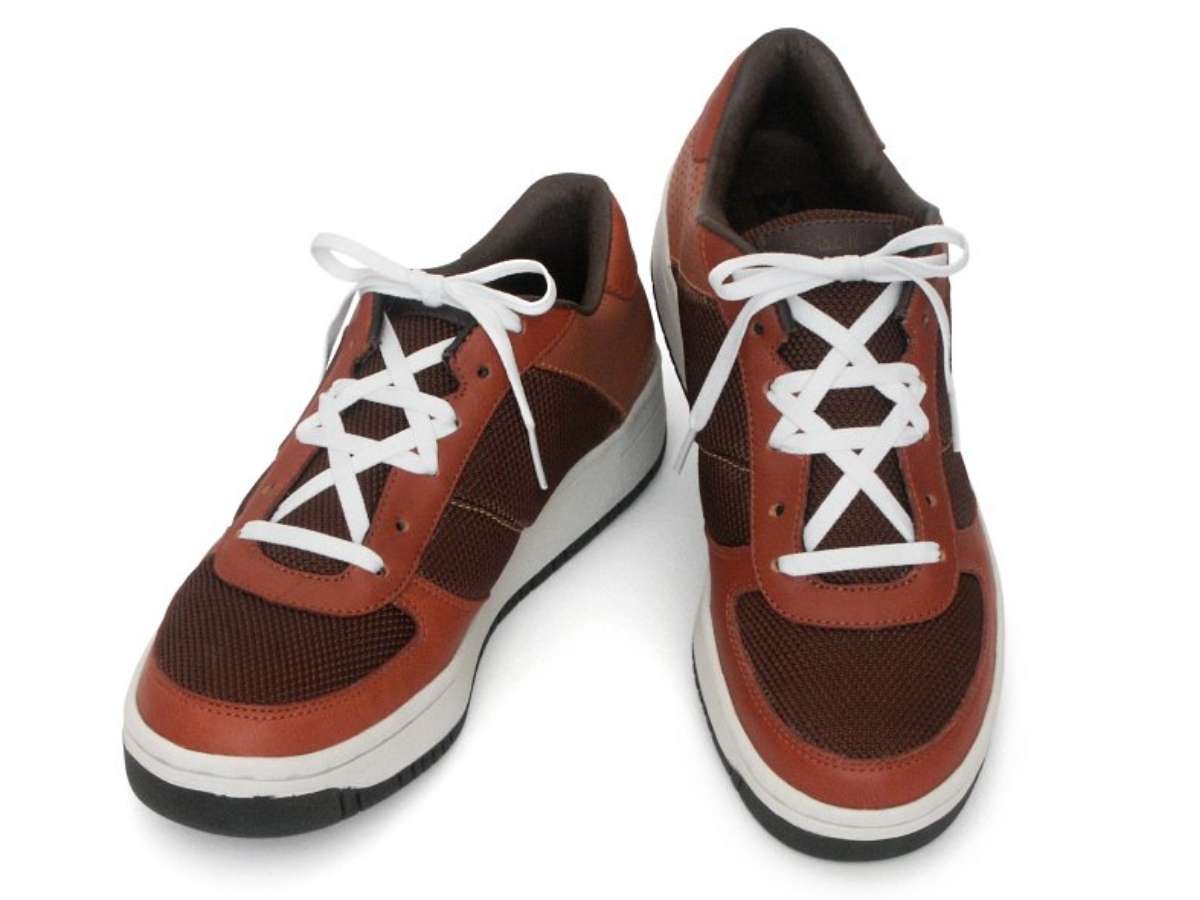
Decorative lacing turns ordinary sneakers into statement pieces ideal for photos or casual display. These methods prioritize visual appeal over athletic performance.
Top Decorative Options
- Straight Bar: Creates clean horizontal bars on the outside for a dressy look.
- Lightning: Forms a striking zig-zag pattern resembling a lightning bolt.
- Starburst: Converges all laces at the center for a dramatic radial effect.
- Chevron: Mimics military insignia with alternating V shapes.
- Hidden Knot: Tucks the final knot inside for a seamless finish.
Pro Tip: Use contrasting colored laces on white sneakers to maximize the visual impact of these decorative patterns.
Performance Techniques for Athletes
Serious athletes require lacing that enhances functionality beyond basic fit. Specific techniques reduce friction or increase locking power for demanding environments.
Friction Reduction and Locking
- Over Under: Alternates crossover direction to reduce lace wear and ease tightening.
- Zipper: Hooks each lace under the previous crossover to prevent loosening during activity.
- Knotted: Adds a half-knot at every crossover for maximum security in skates.
These methods address specific needs like frequent adjustment or extreme tightness requirements.
Specialized Lacing for Unique Needs
Certain situations demand non-traditional approaches ranging from military efficiency to adaptive accessibility. These specialized methods solve unique functional problems.
Functional Variations
- Quick Release Ladder: Allows paratroopers to remove tall boots instantly by pulling one loop.
- Segmented Lacing: Uses two separate laces to control tightness in different foot zones.
- One-Handed Lacing: Anchors at the top for users with limited dexterity to lace without tying.
These innovations prioritize independence and rapid deployment in critical situations.
Avoid Common Lacing Mistakes
Even the best method fails if executed poorly. Avoid these frequent errors to ensure optimal comfort and safety.
Errors to Prevent
- Uneven Lace Length: Always pull both ends together before tightening to prevent asymmetry.
- Over-Tightening: Restricts blood flow and increases nerve pressure unnecessarily.
- Skipping Testing: Try new methods on short walks before committing to long hikes.
- Ignoring Friction Needs: Match your method to your activity level for best results.
Correcting these simple mistakes ensures your chosen lacing method performs as intended.
Choose the Right Method for Your Needs
Selecting the correct pattern depends entirely on your specific foot shape and intended activity. Use this guide to match your problem with the perfect solution.
| Issue | Best Lacing Method |
|---|---|
| Heel slippage | Heel Lock |
| Top-of-foot pain | Gap Lacing |
| High arches | Parallel Lacing |
| Lace bite | Two-One-Three Lacing |
| Quick on/off | Loose Aesthetic |
| Style focus | Straight Bar |
| Stability | Heel Lock + Segmented |
Rotate between methods based on your daily activities for the best overall experience.
Frequently Asked Questions About Sneaker Lacing
What is the best lacing method for running?
The Heel Lock method is best for running as it prevents heel slippage and reduces blister risk. It creates a secure fit that keeps your foot stable during high-impact movement.
How do I stop my shoes from hurting the top of my foot?
Use Gap Lacing or Parallel Lacing to relieve pressure on the instep. These methods bypass sensitive areas or distribute tension more evenly across high arches.
Which lacing style looks the cleanest for casual wear?
The Loose Aesthetic method offers the cleanest look with hidden ends and a relaxed fit. Straight Bar lacing is also excellent for a neat traditional appearance.
Can lacing methods actually improve shoe fit?
Yes proper lacing can transform fit by locking the heel relieving pressure points and supporting arches. It allows you to customize standard footwear to your specific foot shape.
How do I keep my laces from coming undone?
Try the Zipper method or Knotted technique to increase friction and lock tension in place. These methods prevent loosening during intense physical activity.
Key Takeaways for Lacing Sneakers Perfectly
Mastering the best way to lace sneakers gives you complete control over comfort and style. Simple changes like the Heel Lock or Gap method can eliminate pain and improve performance immediately.
Start by identifying your primary issue such as slippage or pressure and apply the corresponding technique today. Your feet will thank you for the customized fit.