How to Lace Tennis Shoes: 7 Ways
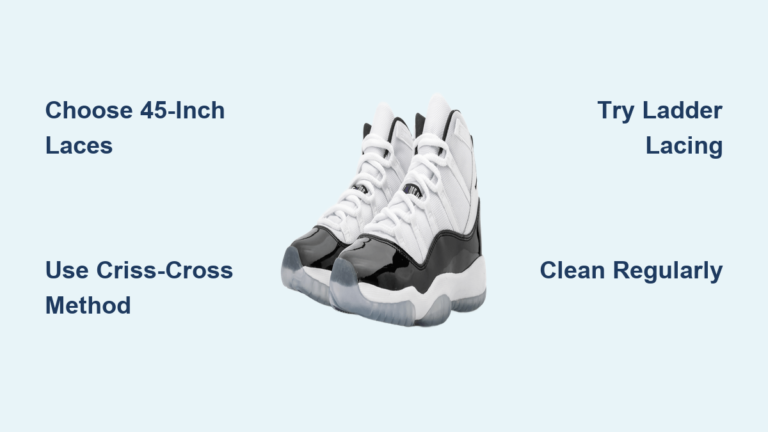
If your tennis shoes slip at the heel or pinch across the top, the solution is often not a new pair but a different lacing method. Most people stick to the basic criss cross pattern, yet there are different ways to lace tennis shoes that instantly improve fit and prevent blisters. From locking your ankle in place to relieving pressure on high arches, changing your pattern transforms performance.
This guide details specific techniques to fix common fit issues and upgrade your sneaker style. You will learn how to stop heel slippage without tightening the whole shoe and bypass painful pressure points on the instep. Whether you need speed for running or a bold geometric look for fashion, mastering these methods gives you total control.
Lock Heel Slippage Instantly
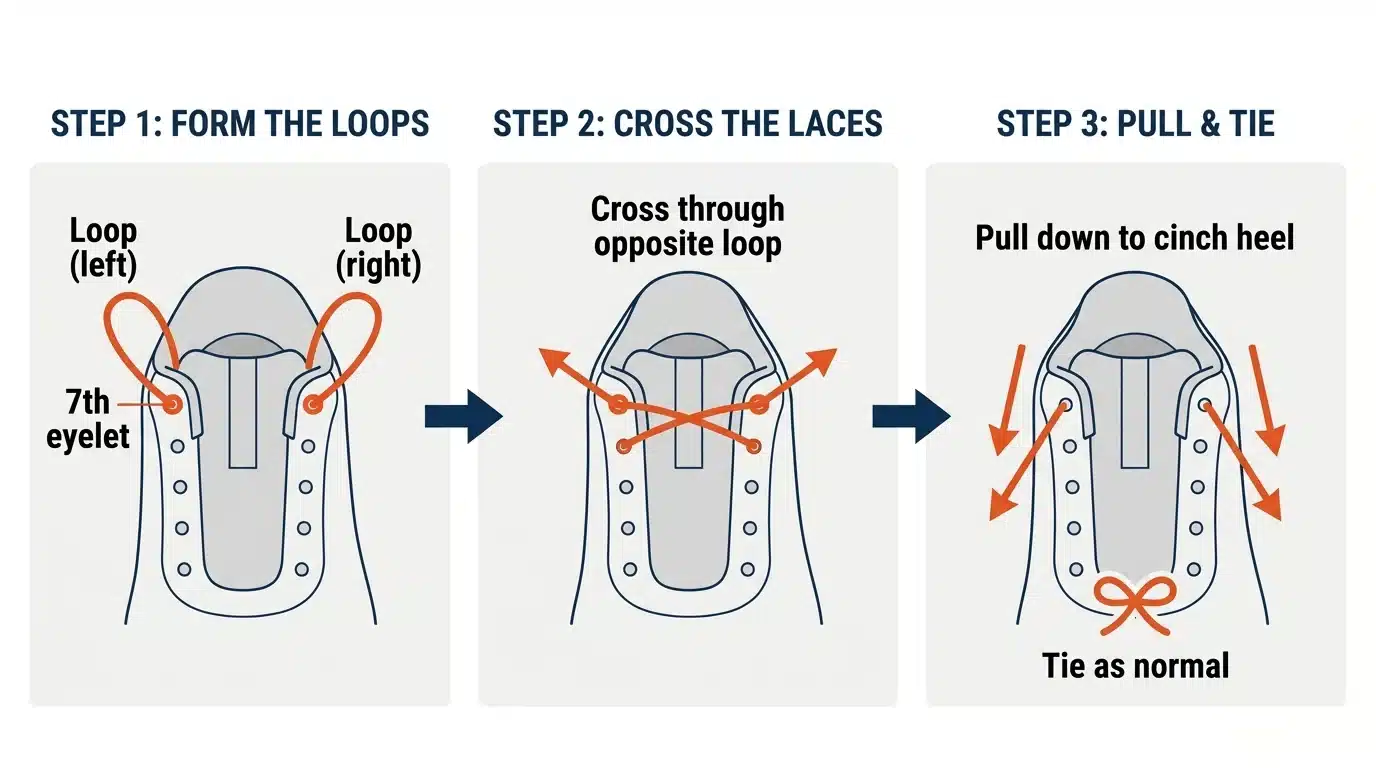
Heel slippage causes blisters and instability during athletic activities. These methods anchor the foot securely without over-tightening the forefoot area.
Use Lock Lacing for Secure Fit
Lock lacing creates a pulley effect at the top eyelets to hold the heel firmly in place. This technique is essential for running or jumping where foot movement inside the shoe wastes energy.
Steps:
1. Lace normally using a criss cross pattern until you reach the second-to-last set of eyelets.
2. Feed each lace end under the vertical segment on the opposite side instead of crossing over.
3. Pull both ends upward and cross them into the top eyelets.
4. Tie a secure bow to finish.
Visual cue: You will see small loops just below the top eyelets that act as anchors.
Pro tip: Combine this with a double knot to prevent loosening during long workouts.
Apply Runner’s Knot for Extra Security
Even perfect lacing fails if the knot comes undone during activity. The Runner’s Knot adds a second locking step to standard tying.
How to tie:
1. Form a standard bow with one loop held in place.
2. Wrap the loose lace around your finger again to form a second loop.
3. Pull both loops tight to create stacked knots.
Result: A knot that resists vibration and tugging during high-impact sports.
Try Two-One-Three to Prevent Lace Bite
Lace bite causes sharp pain on the top of the foot when tight laces press on tendons. The Two-One-Three method redistributes this pressure effectively.
Pattern:
1. Lace across two eyelets normally.
2. Skip one eyelet entirely to create space.
3. Resume lacing across the next three eyelets.
Best for: High-top sneakers or any footwear causing dorsal foot pain.
Warning: Do not skip eyelets near the heel as this reduces necessary ankle support.
Relieve Pressure and Improve Comfort

Tight shoes should not cause pain. These techniques redistribute tension to accommodate wide feet or sensitive insteps.
Skip Eyelets with Gap Lacing
Gap lacing bypasses swollen or painful areas by leaving a deliberate open space in the pattern.
When to use: Bunions, post-surgery swelling, or high insteps.
How to do it:
1. Lace normally up to the eyelets directly below the sensitive zone.
2. Bring both laces straight up to the eyelets above the painful area without crossing.
3. Resume the criss cross pattern from there.
Effect: Eliminates direct pressure while maintaining forefoot and ankle support.
Bonus: This method works exceptionally well with orthotics or thick socks.
Switch to Straight Bar Lacing for High Arches
Straight bar lacing replaces diagonal crosses with horizontal bars to reduce pressure across the foot top.
Steps:
1. Feed both lace ends down into the bottom eyelets from above.
2. Take the right lace straight across to the second eyelet on the left.
3. Run it inside the shoe vertically to the third eyelet on the left.
4. Bring it out and cross to the third eyelet on the right.
5. Repeat this process while keeping outside segments horizontal.
Why it works: No diagonal pulls mean no pinching on high arches.
Style note: This looks clean and modern on dress sneakers.
Loosen Smartly with Loose Lacing
Wide feet or shoes that feel tight after hours of wear need extra room. Loose lacing opens space without sacrificing all support.
Method:
1. Feed both ends down into the bottom eyelets.
2. Bring each lace over the tongue and down into the next eyelet from above.
3. Alternate sides until you reach the top.
4. Finish by bringing each end up through the opposite top eyelet from underneath.
Result: A roomier fit with minimal tension ideal for all-day wear.
Caution: This is not recommended for running as it lacks secure lockdown.
Speed Up Lacing and Adjustments
Fast entry and exit are crucial for athletes and workers. These methods allow independent zone adjustment or rapid removal.
Use Quick Tight Lacing for Zone Control
Split the shoe into two sections so the forefoot and ankle have separate tension controls.
How to lace:
1. Start with both lace ends at the middle eyelets.
2. Lace one end down to the toe using a criss cross pattern.
3. Lace the other end up to the ankle using a criss cross pattern.
4. Tie both ends normally at the top.
Benefit: You can loosen the top for comfort while keeping the forefoot snug.
Perfect for: Trail runners and hikers adjusting fit on the move.
Try Quick Release Ladder for Fast Exit
Ideal for tall boots, this method lets you pull one loop to loosen the entire lacing system instantly.
Steps:
1. Lace normally up to the top three eyelets.
2. Create a horizontal bar at the second-to-last set.
3. Feed each end straight up to the top eyelet.
4. Loop one end over the other and pull to release.
Action: A single tug releases top tension so the shoe opens wide.
Military use: Common in tactical boots for emergency removal scenarios.
Simplify with One Handed Lacing
Designed for limited dexterity, this method uses friction to hold tension without complex tying.
Technique:
1. Anchor one lace end at the top eyelet.
2. Lace diagonally down to the bottom of the shoe.
3. Rely on friction in the eyelets to keep the lace tight.
Use case: Arthritis recovery or wearing work gloves.
Add security: Use a lace clip if extra hold is needed during activity.
Optimize for Sports and Activities
Different sports demand specific lacing configurations to ensure safety and performance.
Keep Knots Inside for Hiking
Loose laces on trails can snag on roots or rocks causing falls. Keep them tucked inside the boot profile.
Method:
1. Use a standard criss cross pattern.
2. Always cross the laces inside the shoe rather than outside.
3. Bring the ends out at the top and tie on the inner side.
Advantage: Prevents lace ends from catching on brush or gear.
Pro tip: Use flat laces as they are less likely to snag than round ones.
Position Laces Outside for Biking
Laces near the chainring can get caught in bike mechanisms. Move them to the outside edge.
How:
1. Cross laces over the outer side of the shoe only.
2. Tie the knot on the lateral or outer side.
Safety benefit: Eliminates risk of chain entanglement while riding.
Also good for: Skateboarding and rollerblading activities.
Secure Mid-Boot with Riding Lacing
High-top sneakers or boots often loosen around the calf during movement. Riding lacing locks the mid-foot securely.
Steps:
1. Start lacing from both the top and bottom eyelets simultaneously.
2. Zig-zag from each end toward the middle of the shoe.
3. Tie the two lace ends together at the center eyelets.
Result: A snug fit around the ankle without over-tightening the toe box.
Originally for: Equestrian and motorcycle boots.
Create Bold Visual Styles

Decorative techniques turn functional laces into art pieces that stand out.
Form Stars with Star Lacing
A dramatic star pattern turns heads and adds unique character to low-top sneakers.
Steps:
1. Start at a top eyelet and feed down to tuck one end behind the tongue.
2. Bring the other end over and down to the third eyelet from the bottom.
3. Weave under and through bottom eyelets to form diagonal arms.
4. Create crossing points that radiate like a star shape.
Best on: Low-top sneakers with six to eight eyelets.
Lace tip: Use contrasting colors to make the star pattern pop visually.
Build Diamonds with Big Diamond Lacing
A bold geometric pattern adds structure and style to fashion sneakers.
How to do it:
1. Start at the second eyelet from the bottom on both sides.
2. Create large loops over the tongue area.
3. Feed each lace through its own loop then down four eyelets on the opposite side.
4. Alternate skipping eyelets to form diamond shapes.
Time estimate: Five to seven minutes per shoe for beginners.
Style match: High-tops and retro models needing reinforced support.
Try Zig Zag for Dynamic Texture
A textured look enhances breathability and adds dynamic visual interest.
Dynamic method:
1. Use one lace to form loops down one side of the shoe.
2. Use the second lace to thread through all created loops.
3. This creates a raised zig-zag ridge up the center.
Visual effect: Looks like a zipper or braided track running up the shoe.
Popular on: Nike, Adidas, and Puma lifestyle models.
Master Military and Tactical Methods
Soldiers and first responders use these laces for speed, security, and uniformity in the field.
Apply Commando Lacing for Simplicity
One end stays anchored while the other does all the work for rapid deployment.
Steps:
1. Anchor one lace end at the bottom eyelet permanently.
2. Run the other end up through every eyelet on the opposite side.
3. Cross diagonally each time to secure the boot.
Benefit: Faster to lace in field conditions with gloves.
Used by: Special forces and outdoor professionals globally.
Use CAF Combat Boot Lacing for Uniformity
The Canadian Armed Forces standard ensures a consistent and secure fit for all personnel.
Pattern:
1. Create straight bars on the outside of the boot.
2. Hide diagonal segments inside the shoe.
3. Tie the knot at the top center only.
Why it matters: Meets strict safety and inspection standards.
Also used in: Lineman and safety boots for industrial work.
Try Ladder Lacing for Paratroopers
A secure pattern used by airborne units to distribute pressure evenly.
How:
1. Create horizontal bars across the shoe width.
2. Connect them with vertical segments inside.
3. The result looks like a ladder running up the boot.
Strength: Distributes pressure evenly across the entire foot.
Durability: Resists loosening under heavy load and vibration.
Upgrade Classic Lacing Techniques
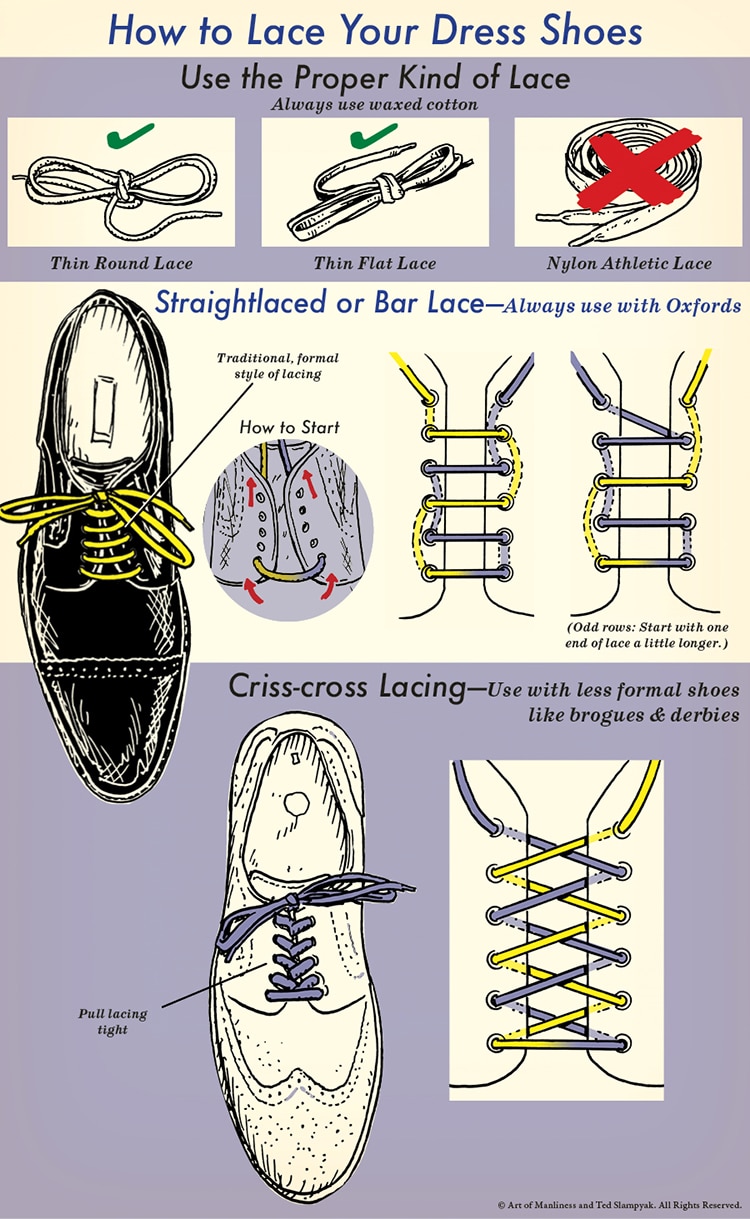
Refining basic methods improves both function and appearance for daily wear.
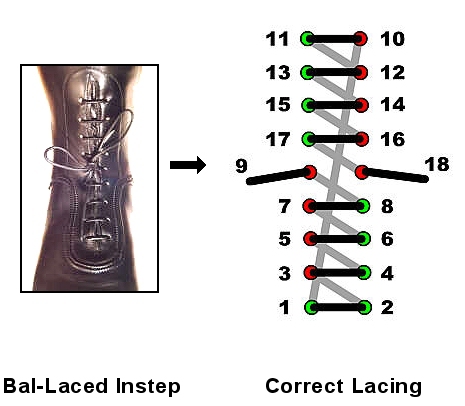
Perfect Criss Cross Lacing
The universal standard is simple, balanced, and reliable for almost any shoe.
Correct method:
1. Feed both ends down into bottom eyelets from above.
2. Cross over and come up from underneath at the next eyelet.
3. Repeat to the top of the shoe.
4. Tie with a secure bow.
Common mistake: Starting with laces coming up from the bottom weakens tension.
Fix: Always start with laces going down into the first eyelets.
Apply Straight Bar for Dress Shoes
Clean, elegant, and pressure-free, this is ideal for formal footwear.
Best for: Oxfords, derbies, and minimalist sneakers.
Pro tip: Use flat laces for a sharper and more professional look.
Hidden knot variation: Tuck the bow inside the shoe for a seamless appearance.
Try X Lacing for Refined Style
A sophisticated twist on the standard criss cross for formal events.
Steps:
1. Start at the second eyelet from the top on both sides.
2. Form a loop with the top eyelet on each side.
3. Feed the lace through the loop and down.
4. Incorporate bar segments under the main X structure.
Occasion: Formal events, business casual, or upscale streetwear.
Optimize Performance with Advanced Tips
Go beyond basic lacing with these technical upgrades for specific needs.
Reduce Friction with Double Helix
Laces angle one way outside and the opposite inside like a spiral to reduce wear.
Benefit: Easier to tighten and less wear on lace material.
Invented by: Monte Fisher for performance optimization.
Best with: Stiff boots or tight fits requiring frequent adjustment.
Lock Each Row with Zipper Lacing
Hooks each crossover under the previous one to zip the shoe closed tightly.
Effect: Prevents slippage and maintains constant tension.
Visual: Looks like a continuous zipper running up the shoe center.
Drawback: Slightly harder to loosen quickly compared to standard methods.
Use Color and Texture for Impact
Two-toned laces or thick round cords can elevate any pattern significantly.
Examples:
* Zig Zag pattern with contrast lace makes the design pop.
* Diamond pattern with flat lace creates sharp clean lines.
* Star pattern with glow-in-the-dark lace stands out at night.
Pro move: Mix lace types such as round for structure and flat for bars.
Frequently Asked Questions About Lacing Tennis Shoes
What is the best lacing method for wide feet?
Loose lacing or Gap lacing are the top choices for wide feet. These methods create extra room across the instep and bypass pressure points without sacrificing overall shoe security.
How do I stop my heel from slipping out of my shoes?
Use Lock Lacing or the Runner’s Knot to secure your heel. These techniques create a pulley effect at the top eyelets that anchors the ankle firmly in place.
Which lacing style is best for high arches?
Straight Bar lacing is ideal for high arches because it removes diagonal pressure across the top of the foot. The horizontal bars relieve pain on the instep effectively.
Can I lace my shoes so they are easier to put on?
Yes, Loose Lacing or One Handed Lacing methods allow for quick entry. These rely on friction or relaxed tension to keep the shoe on while making removal easy.
What lacing pattern uses the least amount of lace?
Bow Tie lacing uses the minimum amount of shoelace length. This is perfect if your laces are too short for other complex decorative patterns.
Is there a lacing method that prevents laces from coming undone?
The Runner’s Knot adds a second locking step to your standard bow. This double knot resists vibration and tugging during high-impact activities.
Key Takeaways for Mastering Different Ways to Lace Tennis Shoes
Choosing the right lacing method solves common problems like heel slippage and foot pain instantly. Whether you need the security of Lock Lacing for running or the comfort of Gap Lacing for wide feet, these techniques optimize your footwear.
Start by identifying your specific fit issue or style goal and practice one new method today. A simple change in how you thread your laces can save you from blisters and upgrade your look immediately.